


articles/Lighting/alikenesspaintedwithlight-page3
by Mike Williams Published 01/04/2008
Props
Nowadays most studios use fewer props. The current style of portraiture is for families and children to be seated on the floor. Small chairs and beanbags are used for babies and small children. A set of stacking boxes or tubs enable you to add variety to your poses.
I do feel that shortly we will see a return to using contemporary props and backgrounds. These things are fashions so they come and go.
Lighting - Setting up the lighting
The first light to be set up is your fill light. In my studio this is bolted to the ceiling with the light facing the back wall, centred over the camera, and it is set to give a reading of f5.6 at the subject position (these are the setting in my studio).
The main light is a brolly or light box, set to give f8 or f81/2 at the subject location (a piece of string is used to distance the light from the subject). As the subject is moved I use the string measure to maintain a constant distance (and hence the same exposure).
The hair light is positioned behind the subject and on the same side as the main light (for larger groups the hair light can come from above and centred to the group).
Care must be taken not to spill the hair light onto the nose or on any part of the face. The hair light is set to the same output as the fill light.
The background light is sited on the floor, pointing upwards, giving a graduation of light. Set your light output the same as the fill light. For location see the diagram.
Reading the Light
You will need a light meter that will read flash power values. Using the light meter with the Invacone attached, take all reading as incident light readings, do not use reflected light readings. The f-stop values in the diagrams are those measured from the sitter's position.
Set up the lighting as above.
Step 1. Switch on the fill light take a reading (in my studio I set this tof5.6).
Step 2 Switch the fill light off; switch the main light on, take a reading(my studio f8).
Step 3 Do the same for all other lights and set them to the same value asthe fill light (f5.6).
Step 4 Switch all the lights on, take reading of total exposure (My studiowill read f8 half ) set the camera to this value (f8 half).
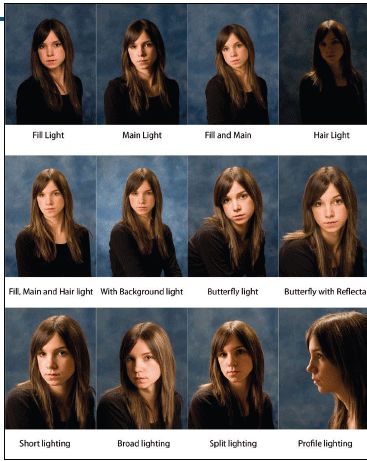
Painting with Light.
The way we use the main light will have a dramatic effect on our sitter. Bringing the light in from the camera position - a flat light is created with no three-dimensional effect.
1. First we set up the fill light. This lights up the shadow area. Flat even light, no modeling.
2. Main light - this shows the effect of main light only. The result is deep shadows with modeling.
3. Main light and fill light - modeling with shadow detail.
4. Hair light only - shows the effect of the light.
5. Main, fill and hair light all together giving modeling, shadow detail and separation from background.
6. Main, fill, hair light and background as above with the addition of colour and more separation to background.
I do hope that this short introduction has helped you to gain the basics in studio lighting. For those of you who would like more details of the Training Days I run, please phone me or email for an update of forthcoming events. A maximum of 10 delegates per session. I also run one-to-one sessions at my studio for you to see how a working studio operates or I can quote for me to attend your studio.
Lighting Patterns
Here I have examples of close light patterns on the face. Whether you are taking classic portraits or modern contemporary work, these patterns should be seen at work.
A. Butterfly lighting - classic beauty light. It gets its name from the butterfly shape of the shadows under the nose.
B. The same as above with the addition of a reflector.
C. Short lighting - Created by bringing the light over the face to create shadows on the side ofthe face closest to the camera. This makes the face look thinner.
D. Broad lighting - The opposite of short lighting, it has the effect of broadening the face
E. Split Lighting - Like short lighting, without any light on the side closest to the camera (has the effect of dulling the eyes).
F. Profile lighting - This effect is created by lighting the face with short lighting and moving the sitter 90 degrees.


SWPP - Society of Wedding and Portrait Photographers
The Society of Photographers
Clwyd Chambers, Clwyd Street, Rhyl, Denbighshire, LL18 3LA, UK
Tel 00 44 (0) 1745 356935
Home Page - Find a Photographer - Benefits of Membership - Events and Seminars - Who's who - Photographic Trade Directory - About - Qualification Structure - Mentor Me Programme - Professional Imagemaker Magazine Articles - FREE information pack - Privacy