


articles/Portraiture/alt-light-page1
by Stuart Wood Published 01/06/2014
They say that a change is as good as a rest and with this in mind, I have chosen something different to talk about for this issue's featured image.
Alternative lighting!
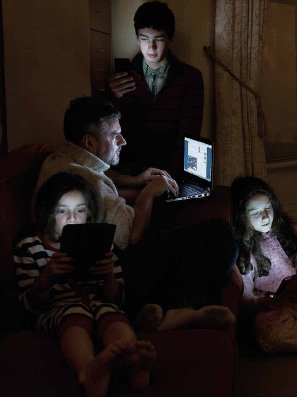
The best and most recent example that I have was shot very recently for The Big Issue and required an alternative approach to suit the editorial requirements needed to illustrate an article about someone who regularly comments on online news articles as a hobby at home.
No less than three non-conventional light sources were used to achieve our picture. The 'main lights' on our subjects are the screens from their devices and we also used the street lights outside to light the windows and the modelling bulbs of our Elinchrom 600 studio heads.
The magazine needed an image for a double-page spread, with the 'action' happening on the left-hand side of the picture, with the right side left 'empty' so that the text for the article could be placed within it.
When shooting any image such as this, great care needs to be taken so that the image will 'work' on the page. For instance, if the space intended for the text has both very light and very dark areas within it, chances are that placing text on such an area will not work, as the light areas will merge with light-coloured text and alternatively dark text will be swallowed by any dark areas, making reading the text either very difficult or impossible. The same is also true for heavy and contrasting patterns or colours. Therefore, it is important to help your client out by presenting them with an area of similar shades and colours on which to place the copy for the article. The most obvious way to do this, as we have no doubt all seen many times, is to shoot the image against a plain background. In this instance, which is an image set in a domestic living room, this is not always possible, so we need to be able to control the image and still meet the full requirements of the client.
For this commission I had been specifically briefed to shoot this on location and leave ample room to run the copy for the article on the right. As we have already discussed in previous columns, when shooting a DPS, you should never place anything important in the centre of the image where the guttering for the page will eventually be placed and potentially splitting in two anything positioned in the centre of the picture.
Another and different technical problem that I faced here was that I wanted the street lights outside to light the windows, to convey a dark winter's evening in suburbia. As the room lights were far too bright for the long exposure needed to capture the street lighting on the windows, they had to be switched off, which meant that the inside of the room was completely black. With the room lights off and the room black, my subjects would render only as lit faces amongst the dark and be devoid of any form or detail, which definitely would not do.
So we needed to introduce some supplementary lighting to help 'balance' the image properly. The trick here was not to overpower the street lights and the 'main lights' lighting our subjects coming only from their devices. With this in mind we rigged two Elinchrom 600 studio heads with standard reflectors only and pointed them away from the image area and bounced the light from the opposite walls of the room.
Bouncing lighting from walls is an old trick beloved by editorial photographers and TV lighting technicians, and it gives a natural feel to the image that is different to lights with attachments such as soft boxes and brollies.
If the walls are painted bright colours, this technique is to be avoided at all costs for the obvious reasons of ending up with brightly coloured casts to your images, as the reflected light will take on the colour of the walls.
As the modelling bulbs are very bright on the Elinchrom heads, I decided to use these as my light source and not the flash. As using the modelling bulbs only would cause colour temperature clashes with the main lights (ie orange tungsten and blue daylight balanced lights) we placed full blue correction gels in front of the studio lights, so that they now became similar in colour temperature to the main lights and the unwanted orange cast was removed. We also needed ND (neutral density) grey gels too, so that the brightness of the modelling lights was further reduced beyond their minimum setting, because they were still proving far too bright for our long exposure of 1/8 second at f4 (and ISO 1600 - thank goodness above for modern DLSRs and their forgiving nature at higher ISOs) Eventually, we managed to balance our lighting with the street lights and the main lights, which we deliberately wanted around a stop brighter on the faces and then we placed the family around our dad, who was the main subject, with him being the centre of the 'pyramid' and perfectly summing up something that occurs in most homes (including ours!) these days of all being alone together!
Everyone was then under strict instructions to concentrate and stay very, very still, and with the help of my trusty tripod and cable release, we achieved our very complicated DPS. ...and not a conventional photographic light source creating any part of the picture!


SWPP - Society of Wedding and Portrait Photographers
The Society of Photographers
Clwyd Chambers, Clwyd Street, Rhyl, Denbighshire, LL18 3LA, UK
Tel 00 44 (0) 1745 356935
Home Page - Find a Photographer - Benefits of Membership - Events and Seminars - Who's who - Photographic Trade Directory - About - Qualification Structure - Mentor Me Programme - Professional Imagemaker Magazine Articles - FREE information pack - Privacy