articles/Printing/alternativeprocesses-page2
The Alternative Processes Are they worth it? - part 2 of 1 2
by Mike McNamee Published 01/04/2006

Lith Printing
Lith printing is carried out in the dark-room just like ordinary monochrome printing except that the normal developer is changed to an over-diluted lithographic one - hence the term lith printing. This change has spurred a genre all of its own, which is why Tim Rudman was able (in 1998) to write a whole book on the subject! The range of tone colours and the subtlety of the lith print has to be appreciated by looking at real prints, which can be created in a range of colours from near pure black through golden peaches and deep purples. Although it can be very rewarding, lith printing can be timeconsuming, requiring as much as 30 minutes of rocking a developing dish - this is not a good way to make money!
As an exercise in Photoshop manipulation it is also very instructive as you think your way through the process and decide just how to re-create the lith effect. We started by making a normal Grade 3 mono print with a full range of tones. Then we made a lith print off the same negative and scanned both. The lith was made with Kentmere Kentona, developed for 15 minutes in Kodak Super RT. Making a few scrap prints first and then leaving it out in the dish to make "Old Brown", the artificially aged developer. This Old Brown is saved for subsequent mixing with fresh, dilute developer. It should not be mixed up with "Old Peculiar" which looks similar but tastes a lot better!
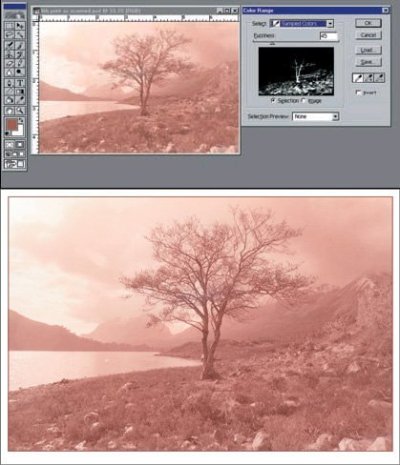
Then we measured the colours and developed Photoshop curves to distort the plain monochrome image to exactly match the colour and tone of the lith print. The curve shapes are illustrated in the screen grabs and include changes to the individual channels and the overall RGB curve

Another characteristic of lith prints is the grainy clustering of silver grains due to a process called "infectious development". The lith printer sometimes deliberately seeks this effect, which is also called peppering. Its characteristic is that it occurs mainly in the most heavily exposed areas of a print (ie the dark parts) although it can also run riot in unexpected ways. A rough cut at the effect may be obtained by applying Monochromatic Noise from the Photoshop Filters' drop down list. In the example shown we applied a value of 40 to the whole image. This is a bit of a cheat because the normal lith print is affected mainly in the dark areas. To achieve this we also made a selection using Select>Color Range. By changing the "Fuzziness" value it is possible to include as much of the dark tones as you choose. You can preview your selection by clicking on the "Selection Preview" and choosing one of the options. In our example we have used "Grayscale". Now when you click "OK" the colour range is converted to a selection and noise may be added only to those dark areas you have chosen.
Want to know more?
In the UK Fotospeed have a comprehensive catalogue of Alternative Process materials for sale. This includes Bromoil, Cyanotype, Gum Bichromate, Argotype and Salt printing kits. They also supply the required contact printing frames and the glass coating rods used to make light sensitive materials. For slightly less alternative processing they also supply Sepia, Blue, Green and Selenium toner kits. Many of these alternative processes are made via contact negative printing and a modern method is to create the negative onto an ink-jet printed OHP film. These are also available from Fotospeed. For the slightly less adventurous, Lith printing kits are available as well as Lith developers and double weight fibre base lith paper. All this is in addition to their traditional black and white printing materials including developing and printing materials. They also supply a range of specialist books on monochrome processing. visit www.fotospeed.com
Please Note:
There is more than one page for this Article.
You are currently on page 2
- The Alternative Processes Are they worth it? page 1
- The Alternative Processes Are they worth it? page 2
1st Published 01/04/2006
last update 09/12/2022 14:51:02
More Printing Articles
There are 0 days to get ready for The Society of Photographers Convention and Trade Show at The Novotel London West, Hammersmith ...
which starts on Wednesday 14th January 2026


