


articles/Fine-art/artisticendevours-page1
Published 01/06/2006
By Jan Hardman
Portraiture will always be a sought-after art form, accomplished differently, according to what is available at any particular time in history. Never has there been such a fascinating period as the present with all the past technique available to which has been added digital imaging.
Painter has actually been designed for beginners and experts alike but was completely new to me. It has been a fascinating journey, spending many hours experimenting with Painter's numerous and complex effects, yet feel I have only scratched the surface. It's like taking a paintbrush and dipping it into a photograph and then blending the pixels - the result is magical, you can almost smell the turps! I'm looking forward to unlocking the seemingly limitless secret formulas, which I'm sure are waiting to be discovered.
Watercolour or Oil
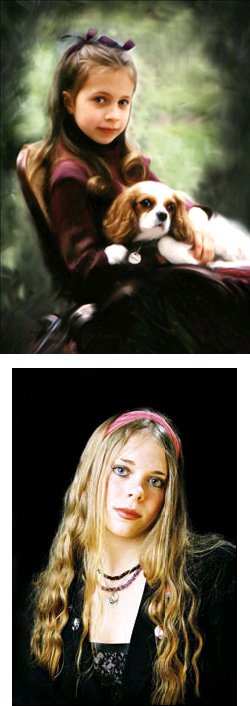
After choosing your image you need to decide whether the painting is going to be an oil or watercolour. Is the style and overall key, light or dark? If the image were predominantly light then I would choose watercolour. My photograph is of Emily, a young woman, shot against a dark background, I decided to paint her in oils, with a final output onto ink-jet canvas.
Resolution and File Size
The next decision is to choose the size of your final painting? Change the original image to the size of the final output, unless it is going to be larger than 16in x 20in, when I suggest increasing the size after you have finished the painting, because of memory issues.
Set the colour mode to RGB at a resolution of 300 ppi.
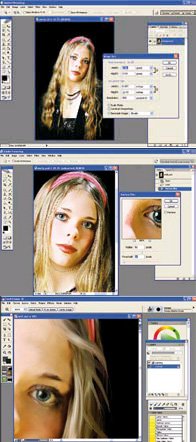
Colour correction - Open your image in Photoshop, resize it, set the resolution and colour mode.
Duplicate the background layer and rename it 'Retouched', this becomes your working layer. Use a levels adjustment if required to refine your tone range. With the retouched layer active, use the Healing, Patch or Clone tool to clear any blemishes, stray hairs or marks you don't want in the painting.
The Eyes
To bring life to the eyes, add light to the lighter parts of the eye and darken the darker parts. Use the zoom tool for detailed work. Select the Burn tool and darken the pupil and the ring around the iris.
With a very small brush darken the eyelashes and eyebrows one lash at a time, following the direction of the hair. There should only be one catch-light in each eye, paint a white dot on the edge of the pupil then drop the opacity so that it's not too sharp. If there is more than one catch-light, clone out the extra, using the nearby iris structure. To lighten the whites of the eyes, have white as the foreground colour, choose a soft-edged brush and change the Blend Mode to Colour, don't overdo this stage, as you don't want a startled look, drop the opacity and softly paint into the whites of the eyes. Note that this method can also be used for whitening teeth.
Add a Blur to the Face
Surface Blur is new to CS2; it really softens the skin giving it a much clearer finish.
Draw a loose selection around the face and apply a surface blur, (Filter>Blur>Surface Blur).
In the dialogue box set the radius to 50 and the threshold to 10; click OK, then deselect.
Now add a layer mask and paint away any blur from the mouth, eyes, nostrils and eyebrows.
Flatten the image
To Corel Painter
The image is now ready to open in Corel Painter. Open your image in Painter, then open the Layers Palette, create a new layer; this adds a layer above the canvas layer - rename this layer 'painting'. Check the 'pick up underlying colour' box, this will merge colours from the photo with the colours you will be applying. The next step is to choose a brush from more than 30 brush categories. This is a minefield and time needs to be spent here, finding the brushes that are going to suit you best - the only way is by experimentation. To choose a brush, click the brush category, found at the top right of the screen, and then choose a brush variant, next to the brush category. One of the most powerful features of Painter is its blending capability. You are not restricted to blending digital paint media, you can also blend the pixels in an image. Blender brushes don't apply paint; they change the paint that's already there in the image.


SWPP - Society of Wedding and Portrait Photographers
The Society of Photographers
Clwyd Chambers, Clwyd Street, Rhyl, Denbighshire, LL18 3LA, UK
Tel 00 44 (0) 1745 356935
Home Page - Find a Photographer - Benefits of Membership - Events and Seminars - Who's who - Photographic Trade Directory - About - Qualification Structure - Mentor Me Programme - Professional Imagemaker Magazine Articles - FREE information pack - Privacy