


articles/Photoshop/banashingfringing-page1
by Mike McNamee Published 01/01/2006
Moire fringing is caused by the interaction between pixel spacing in the digital chip and the detail spacing in the subject. Typically the weave of a coat can be imaged at close to the pitch of the pixels. Hence. although the weave of the coat may be a millimetre or so, by the time it is imaged by a lens it can easily start to match the pitch of the camera CCD pixels. Trouble ensues, normally as an annoying colour fringing, snaking its way across a fabric garment, as the weave is presented at different angles (and thus scale) to the chip. The effect is scaledependent and can be avoided by zooming in or out, although this is not always practical. In the early days of television the Beeb solved the problem by banning the the presenters from wearing things like Harris Tweed.

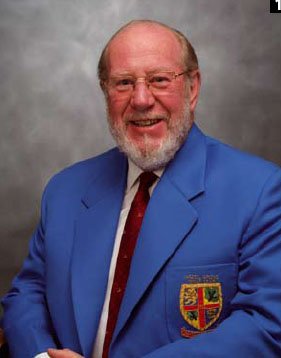
In the example shown, a golf-club captain is photographed in his blue jacket. As this is his "badge of office" there is no chance of asking him to change his coat! There is also little opportunity to change the scale of the shot as he is to go on the wall, alongside all the other captains (some clubs insist on near exact replication of pose and backdrop for the successive shots).
1. Firstly, we corrected the skin tones - just because we could - the Captain was rather sunburned and a little flushed [1]. This was done with a selective colour adjustment layer, adding a little yellow to the red and desaturating them. None of this has anything to do with moire! [2]
2. The Background layer was stamped along with the adjustment layer using the shortcut Ctrl-Alt-Shift +N+E.
3. We examined the red, green and blue channels individually, noting that the green was free of moire while the blue and red were not. [3]
4. The basis of the technique is to first make a selection of the blue jacket [4] and then copy the green-channel part of the selection into both the red and blue channels (channel replacement). With the selection of the jacket active, click on the green channel in the Channels Palette and then Ctrl-C to copy it to the clipboard. Then click on the blue channel and click Ctrl-V to paste it over the existing bluechannel. Then activate the red channel and hit Ctrl-V to paste the green channel over the red. The image of the jacket (only) will now be monochrome.
5. Recover the blue colour as much as possible by activating the blue channel and adjusting the Levels sliders (Ctrl-L)[5].
6. Finish off by picking the blue of the jacket from the original background, making it the Foreground colour. Then, using a large brush in colour mode, and with the selection of the jacket still active, paint the correct blue over the jacket area. [6]
Something to note: Detail that is likely to show moire can also make a false appearance on screen, depending on the screen's zoom magnification. Use 100% scaling on screen by double clicking the zoom tool in the toolbox. If moire is still present it is likely to be real.


SWPP - Society of Wedding and Portrait Photographers
The Society of Photographers
Clwyd Chambers, Clwyd Street, Rhyl, Denbighshire, LL18 3LA, UK
Tel 00 44 (0) 1745 356935
Home Page - Find a Photographer - Benefits of Membership - Events and Seminars - Who's who - Photographic Trade Directory - About - Qualification Structure - Mentor Me Programme - Professional Imagemaker Magazine Articles - FREE information pack - Privacy