


articles/Photoshop/blendingmodes-page2
by Sofie Louca Published 01/12/2009
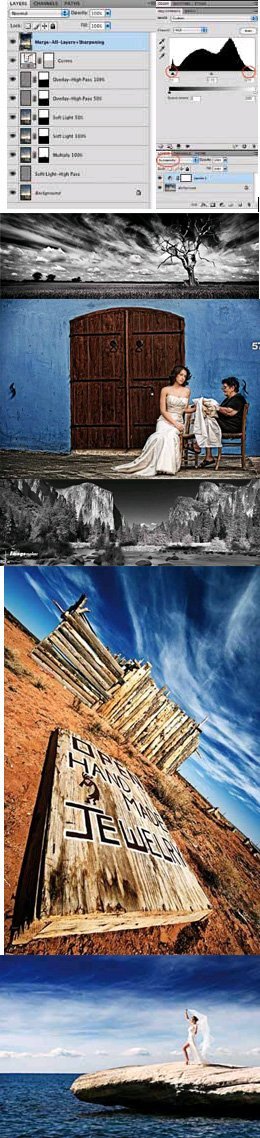
Almost done! Next I made a new layer of all the previous layers put together. You can do this by being on the uppermost layer in your palette and hold down Command, Alt, Shift, E on a MAC (Ctrl, Alt, Shift, E on a PC). I then added a High Pass effect to the image by going to Filter>High Pass and setting the slider to about 20%. The high percentage here is to give a more pronounced, almost embossed, effect, rather than simply sharpening. This layer can be set to either Overlay or Soft Light depending on how strong you want this effect to be. I then went to Adjustments>Hue/Saturation and took the slider down to -100 to remove any colour saturation in the high pass layer. Should there be any haloes around the edges of the subject (especially if it's a subject against a blue sky) a mask can resolve this issue. Finally, a little cloning of distractions and a curves adjustment layer to bump up the mid-tones finishes off the image.
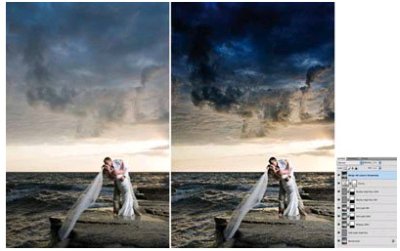
The technique of using Multiply & Overlay blending modes is a great way of enhancing details, adding contrast and overall gives extra intensity to an image. It is also a method we often use to darken skies as shown in some of the landscape images in this article.


SWPP - Society of Wedding and Portrait Photographers
The Society of Photographers
Clwyd Chambers, Clwyd Street, Rhyl, Denbighshire, LL18 3LA, UK
Tel 00 44 (0) 1745 356935
Home Page - Find a Photographer - Benefits of Membership - Events and Seminars - Who's who - Photographic Trade Directory - About - Qualification Structure - Mentor Me Programme - Professional Imagemaker Magazine Articles - FREE information pack - Privacy