articles/Digital/brushestechniques-page1
My Favorite Brushes and Brush Techniques For Watercolours - part 1 of 1
by Jane Conner-ziser Published

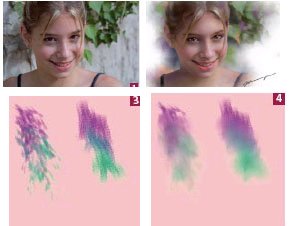
Watercolour portraits are really popular right now and many photographers are rushing to learn Painter, the best software on the market for replicating fine art mediums. I really love the time I spend in Painter - I like to close the door, forward the phones and put on some inspirational music that's loud
Aside from the obvious creative exercising of spontaneity in paint, there are some basic ways of adding and blending colours to bring out expression and feeling in your paintings. Watercolour lends itself nicely to feelings that softly float, dance vibrantly or stand aggressively on the paper - all dependent upon the artist's choice of colour, the application of it and the expression of the artist's brush strokes.
In this article I will share some of my favourite default Painter brushes and styles to bring out feelings that range from soft and gentle to playful and dancing, and show you how you can blend paint and photo together to create objects and movement in your paintings.
because it simply shows a lot of the things you can do with Painter, and partly because many of you have either seen or worked with the image
Applying the paint:
My favourite brushes for applying paint are Artists, Impressionist and Chalk, Square Chalk. The Impressionist brush adds light texture that I try not to blend out too much because it's uplifting in a painting. The Square

Distorting the paint:
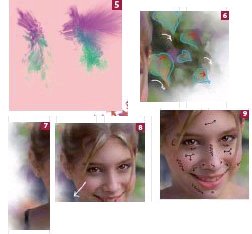
It's easy to forget about some of the important digital brushes in Painter. I find that distorting the paint into the base image produces very interesting results and quickly takes the image away from photography and into fine art. I usually distort the paint prior to blending and my favourite default brushes for distortion are Distortion/Hurricane, Pinch and Marbling Rake and FX/Squeegee and Hair Spray. Don't use all of them on the same image, though, pick one that gives you the feeling you want and stick with it for continuity in the paint. [5]
Blending:
Illustration B-1 shows the directions of the strokes I used on the different areas of the image. Notice that I not only follow the contours within the original shapes, I also pull paint and image around a bit to create my own pieces of the painting and bring movement to it. For watercolours, my favourite blending brushes are Blenders/Grainy Water and Just Add Water at around 30% opacity, depending on whether you like texture or not. Sometimes I use Smudge. While I am blending different parts of the painting, I try to repeat shapes, colours and angles. This creates
Notice that I blend large areas with a repeated figure 8 shape. This gives me watery mottled colours and I like the feel of it. In tight areas I use the same stroke, only smaller brushes. [7] I "comb" the hair, picking out directions of "clumps" of hair
When I extended the one strand that hangs over her face on the left side of the painting, I did so by moving it out to create the illusion of wind. [8] When I am blending the skin, I start in the middles of the specular highlights and blend outward, shaping the edges of them to contour to the shape of the face. Next, I work around the edges of the diffused highlights and blend into the shaded sides. I select smaller brushes for smaller areas, like the nose and the eye sockets. [9] 6 7 8 9
NEED MORE? Jane Conner-ziser has a number of instructional DVDs, available under the Software Cinema label which deal with Fundamental and Advanced retouching technique as well as Painter and Photoshop Techniques from which this feature is taken. Contact Head Office for details 01745 356935.
You are currently on page 1 Contact Jane Conner-ziser
1st Published
last update 09/12/2022 14:52:01
More Digital Articles


