


articles/Software/cuttingphotoshopdec-page1
by Jane Conner-ziser Published 01/12/2012
First let me say that I am passionate about retouching! I've been doing it almost as long as I've been photographing - long before digital came along - and I guess I am in love with it because it can take pictures far beyond what a camera is capable of capturing. I retouch everything and I confess to being rather shameless about moving trees and recomposing pictures, but as the bulk of my business is in the portrait industry, I specialise in the portrait arts.
Regarding retouching people, I'd like to say that people are beautiful, just the way they are. Portrait retouching is not about reshaping people's faces and bodies. It's not about making people look younger or prettier than they are in real life. Professional portrait artists do not change the way people look! The advertising and fashion industries consider people to be props who sell products or ideas, but the portrait industry is careful about preserving character and bringing out the best expressions of people because our work goes to families and friends who love our subjects and treasure them just the way they are.

See if you can pick out everything I did!
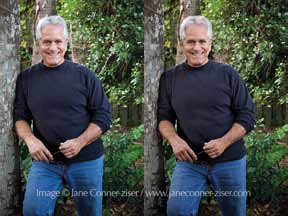
Because of this, my retouching process leaves the face for last. The first thing I'm going to do is make sure the image is the best it can possibly be. I crop it, tone down corners and fill in backgrounds if it will improve the image. I remove objects that are not important. Here is a sample of a portrait that is visually improved with retouching but has very little applied to the face. I added foliage over unsightly twigs and branches, toned down the tree trunk on the left and the blue jeans and the flesh tones on the arms, pushed the hip in slightly on the right, straightened the shoulders and removed the spider webs (really!) from the sweater. The only work on the face was toning down oily skin and slightly brightening the teeth. He looks great though, aye!
I do the global image adjustments in ACR, Lightroom or NIK Viveza, depending on the job. I prefer to do everything else in Photoshop because I have a lot more control there. Retouching is faster, easier and better in Photoshop.
After image adjustments and background work have been completed it's time to move on to the body and the clothing. I know it's tempting to remove all the lumps around the middle but it's better if you go no further than about 50%. When I work on bodies, my first thought is for the posture, then I'll look at how smoothly the clothing fits the body. After those issues have been taken care of I might nip and tuck a bit here and there but I won't change the overall body style of my subjects. Here are two samples of body and clothing work that were retouched using a variety of tools and techniques: Dodge and Burn, Layer Masks and Blending Modes, Puppet Warp, Liquify, Free Transform and Paint for sure!
All of the work on the above samples was done in Photoshop. The next step en route to the face is the hair. It's amazing how retouched we look when our hair is neatly in place - or perfectly messy down to the details, depending on the style. I fill in hair, re-shape hair, add highlights, I remove stray hairs - whatever it takes for the hair to look perfect.


SWPP - Society of Wedding and Portrait Photographers
The Society of Photographers
Clwyd Chambers, Clwyd Street, Rhyl, Denbighshire, LL18 3LA, UK
Tel 00 44 (0) 1745 356935
Home Page - Find a Photographer - Benefits of Membership - Events and Seminars - Who's who - Photographic Trade Directory - About - Qualification Structure - Mentor Me Programme - Professional Imagemaker Magazine Articles - FREE information pack - Privacy