


articles/Lens/depthoffield-page4
by Mike McNamee Published 01/08/2007
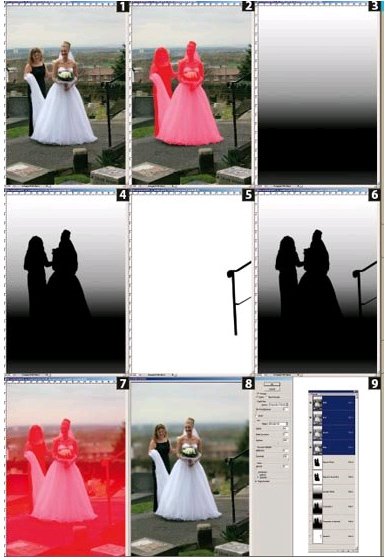
1. The starting shot. No opportunity to move back, a 30-foot drop behind the bride and a cluttered backdrop.
2. First make a mask to silhouette the bride and bridesmaid and soften it with 3px Gaussian Blur.
3. Make a gradient mask running deep grey though to black then out to white at the top.
4. Combine masks 3 and 2 to create a composite.
5. Use the Pen Tool to create a mask for the handrail and fi ll it with solid black.
6. Add the handrail to the mask made at [4].
7. This fi nal mask is an alpha channel and is used by the lens Blur Filter.
8. This controls the strength of blurring - maximum where the mask is white, no blur at all where the mask is black.
9. The various masks are saved as alpha channels as they are made so that they could, if necessary, be adjusted or remade.
One of the most often heard criticisms of portraiture is the lack of differential focus. Exploiting shallow depth of field adds depth to an image, isolates the subject and brings emphasis to those parts of the picture you choose to focus on. Occasions arise which force you to use a wider angle, smaller maximum aperture lens - typically a group inside a church, with no ability to step back from them. The wide angle has three effects - the smaller focal length produces a very small increase in depth of field; the lens may quite likely have a restricted maximum aperture (hence a large increase in depth of field) and the wider view behind the group might contain a larger selection of distracting elements (ie three fire extinguishers instead of one, or none - you might be able to hide one behind the groom, hiding three more gets exponentially trickier!).
This is where technology comes to the rescue - the Photoshop Lens Blur Filter.
The Lens Blur facility provides a highly realistic way of blurring a background in just the same way as a very wide aperture lens might. It may not be anywhere near as fast as getting the depth of field down 'in-camera', but, providing you master the technique, it will do an equal or better job. Indeed, if using a zoom at f2.8 carries too much penalty in edge-to-edge sharpness and general image contrast, then shooting at an optimum f5.6 and decreasing the depth of field in Photoshop may provide a superior result.
The basis of the method is that you make a mask to control the depth of field blurring of the filter in a realistic way. A mask with an underlying gradient in it can be used to blur the foreground a little, the subject (in the middle distance) not at all and the background quite a lot. To do that, the gradient mask needs to be lighter in the foreground, fully dense-black across the subject, then tapering out to white in the distance parts of the image. Applying Gaussian Blur produces a similar but less sophisticated effect - for one thing the blurring makes those parts of the image look grain-less and has the effect of dulling out-of-focus highlights towards a mid-tone. The Lens Blur filter allows control over the grain (noise) you put back, the qualities of out-of-focus highlights and even the shape of the lens aperture. Old lenses with very fine, multi-bladed aperture diaphragms produced more refined highlights than cheaper alternatives with diamond-shaped apertures.


SWPP - Society of Wedding and Portrait Photographers
The Society of Photographers
Clwyd Chambers, Clwyd Street, Rhyl, Denbighshire, LL18 3LA, UK
Tel 00 44 (0) 1745 356935
Home Page - Find a Photographer - Benefits of Membership - Events and Seminars - Who's who - Photographic Trade Directory - About - Qualification Structure - Mentor Me Programme - Professional Imagemaker Magazine Articles - FREE information pack - Privacy