


articles/Digital/digitalsoftars-page1
by Carol Steele Published 01/06/2002

Using the power of Photoshop you can produce superb softening of images which are in many ways superior to what you can achieve using traditional Softars on your camera.
By softening from within Photoshop you can accurately control the amount of softening to just the areas which you want to soften, other areas will remain pin sharp. The technique, which I am about to describe, is fairly easy to achieve and will only add a few minutes to the total preparation time of the image.
The above is the original image which I shall start with and what you need to do is make a selection of the areas which you want to soften, in the above case this will be the skin areas. Firstly though I generally quickly clone out the most obvious skin blemishes and then make the selection. I would generally use the magic wand to quickly select the skin areas and then I would go into Quickmask mode to further refine the selection. You will end up with the image looking like the one below left:-
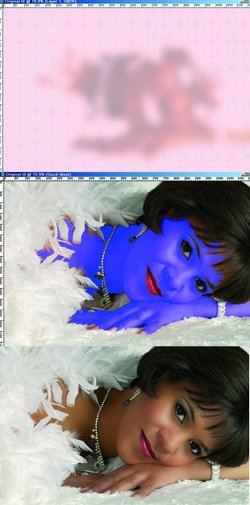
Activate Layer 1 and reduce the opacity of this layer to around 60% - this will control the amount of softening applied to the final image - and then apply Gaussian Blur to this layer. Choose a value of around 15 to 30 depending on the size of the image and the spread of softening required. The layer should now look like the image (right). To make certain that the parts of the image which you require to remain sharp are kept sharp, it is necessary to cut out any of the excess blurring and to do this the saved selection is loaded as an inverse of the original selection. So, go to the Selection menu and choose the 'load selection' option, find your saved selection and make sure the check box named 'Invert' is checked. Once loaded hit the [Delete] key and this will ensure that the areas you require sharp are kept sharp and will not be affected by the softening we have introduced into the image. Make sure that you deselect the selection after having done this step. The next stage is to blend the two layers which we have using the blending modes which we have available in PhotoShop. The one which is required is the 'Soft Light' blending mode. Activate the original layer (Layer 0) by selecting it in the layers palette and then go to the modes box (it will be set at 'Normal' at the moment), hit the small arrowhead at the side of the box and select the option 'Soft Light', the image will now be softened. You can now make any final adjustments to the amount of softening by activating Layer 1 and fine tuning the opacity of this layer until you are happy with the degree of softening obtained. Once everything is the way you want it you must then flatten the image. Using this blending mode tends to introduce a slight increase in the saturation of the softened areas of the image so it is necessary to knock back the saturation a small amount. To do this first load the saved selection and then go to the Image menu and choose 'Adjust' and then choose the 'Hue and Saturation' option. In the Saturation box enter the figure '-10' and hit the OK button. As a final step, I tend to whiten the eyes (and teeth if they are showing). To do this I first use the 'Sponge' tool which I set to around 30 to 40% and quickly remove any discolouration from the whites of the eyes and the teeth. I then lighten using the dodge tool which I set up as 10% and set to 'Shadow' areas. This tends to prevent over whitening and gives the final image a much more realistic appearance.


SWPP - Society of Wedding and Portrait Photographers
The Society of Photographers
Clwyd Chambers, Clwyd Street, Rhyl, Denbighshire, LL18 3LA, UK
Tel 00 44 (0) 1745 356935
Home Page - Find a Photographer - Benefits of Membership - Events and Seminars - Who's who - Photographic Trade Directory - About - Qualification Structure - Mentor Me Programme - Professional Imagemaker Magazine Articles - FREE information pack - Privacy