


articles/Photoshop/drawingveil-page1
by Mike McNamee Published 01/02/2006

Cutting out shapes such as hair from complex backgrounds has always been a problem. Like all problems it has drawn to it a number of solutions from developers claiming wondrously easy and immaculate cutouts in less than two seconds! The reality, as we know, is slightly trickier. Cutouts always were and remain difficult; the image information available to make the 'cut or leave' decision has not changed at all. This is where the clever computer programmers come in, they make using that data faster and simpler. Fluid Mask seems to be something of an advance in speed for simpler jobs but we retain some reservations about how effective it is in real situations.
Learn Your Trade
Before starting out with Fluid Mask you must understand the way it operates and the excellent video tutorials are compulsory viewing! They pop up as you run the program from the Photoshop Filter menu. There are 10 of them, six on basic and four on tips and tricks (including complex images, hair, defocused edges and spectral edge effects). Each tutorial lasts a couple of minutes and if you spend a morning at your studies you should be able to tackle the easier jobs efficiently. Don't be tempted to dive in and separate a bride's veil from the net curtains - you are almost certain to fail!
Briefly
While there is no point in reiterating what is covered by the tutorials, it is worth pointing out the key features.
After installation, Fluid Mask appears under the Photoshop Filter menu. An image has to be active in Photoshop to make it work. The Tool bar comprises a dual set of three selectors to determine which colours are cut and which are retained. The trios are for exact colours (ie the area under the brush), local areas (ie contiguous pixels) and global colours (ie all pixels in the image of the same colour values). It is very like select and select similar in Photoshop.
For our first exercise we abandoned our own advice and went for something reasonably tricky (bear in mind though that we are experienced in Photoshop Extract, Corel Ultimate Knockout and Extensis Mask Pro). This consisted of an image of Rydal Water under relatively low contrast lighting (and improbably green grass!). The difficulty arose because the trees in the foreground and background are similar colour values and overlapping. To use Fluid Mask you drag the Keep Tool over the image bits you wish to retain. Using Local or Global, when you let go of the mouse button the program selects pixels which meet the criteria of pixels under the brush mark. If you overselect it is best to undo and start afresh. You then switch to the Delete Tool and mark those colours you wish to lose from your cutout. Areas in between are transitional and are called complex by the program and may be dealt with separately if needed. At this stage the job might be completed to your satisfaction and you can do a trial cutout before transporting the cutout image back to Photoshop with a transparent background. If you choose, you may perform test renders on selected parts of your image so that the selections may be refined. This is done via the Region Editor.
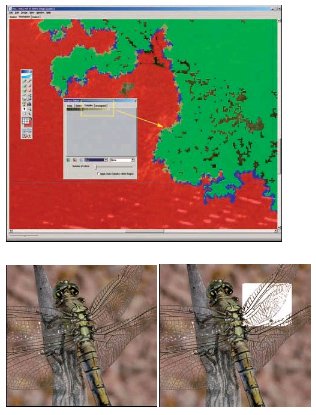
The Region Editor marquee is dragged over a chosen area and this in turn brings up an additional pane in which you may select the tabs for keep, delete, complex or unassigned. These have a list of icons showing the colours allocated to each category and you may select single or multiple icons and see the effect that this has on the selection. If you like what you see you apply the change by adding the pixels to the chosen new category. The method looked very convincing in the tutorial movie (they always do) so we got our own dragonfly shot out and tried it. Our dragonfly was doing what dragonflies do best - hiding among a similar-colour background! We eventually got a better result by using the Region Editor to select colour carefully but did not achieve success anywhere like that shown in the tutorial.
The Bridal Veil
This is the ultimate challenge to a cutout program, to separate a bride's veil from its surrounding, and include enough transparency for the new surroundings to show through the veil. Fluid Mask failed to recognise that the black colour, which had invaded the veil, was not part of the veil and chopped the whole lot out, black backdrop and all. We had slightly more success by defining the thinner areas of lace as complex, which then rendered them more transparent in the final cutout. However transferring the cutout image back to Photoshop without a mask to adjust is not as good a way of working even if it is faster. By comparison Ultimate Knockout creates an alpha channel, which can be adjusted downstream, in Photoshop. For the bridal veil we managed a good cutout with Photoshop (alone), Fluid Mask and Extensis Mask Pro 3. In all cases we improved the look of the final result by duplicating the cutout layer and putting the duplicate into screen mode to lighten the veil, followed by selective masking to tone other parts of the image back down.


SWPP - Society of Wedding and Portrait Photographers
The Society of Photographers
Clwyd Chambers, Clwyd Street, Rhyl, Denbighshire, LL18 3LA, UK
Tel 00 44 (0) 1745 356935
Home Page - Find a Photographer - Benefits of Membership - Events and Seminars - Who's who - Photographic Trade Directory - About - Qualification Structure - Mentor Me Programme - Professional Imagemaker Magazine Articles - FREE information pack - Privacy