articles/Weddings/enhancingperceptive-page3
Enhancing Your Perceptive Abilities at Wedding Shoots - part 3 of 1 2 3 4
Published 01/09/2006

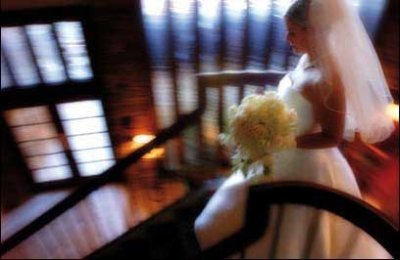
Did I say deadspace was hard to learn? Well, there is a harder one: depth! Seeing what is in front and to the back of the subject is very important. Knowing how the background/foreground will affect the look of the subject in a composition is very important. The shades of dark and light, lines, and the complexity of the background/foreground elements can make or break an image. Colour can add depth. It also can detract from the subject. B&W can flatten depth, but can enhance the subject, making it easier for you to focus on the emotional elements of the subject-story. I believe each image should be viewed for these concepts of depth in postprocessing before committing to B&W. To make things more complicated: colour can enhance the subject and converting to B&W may totally lose your subject in a sea of pattern and light. Perception during postprocessing is also very important and can be learned with practice. I suggest posting images on the Digital Wedding Forum and asking detailed questions about depth and your use of colour or B&W on the same image.
Knowing what to include and not include in your composition, behind, to the side, and in the front of your subject is all about understanding depth.
This is all starting to really get interesting! (6) (7)
Obviously lines are very important to me! How you perceive lines and how they interact with your subjects can bring an ordinary composition into the realm of art. Lines are amazing pointers. They add depth to an image. They will help your eye follow through to your subject and add interest when looking at a print.

Well, of course you can just fill the frame with just your subject, but wouldn't it be so very boring if all your shots did this? The wedding day is your canvas to paint, why not use all those brushes, paints, and tools you spent good money on to create your own stylized form of art! Here is a fun way of finding lines: fill the frame with your subject, now step back or zoom out and search for lines through the viewfinder that lead into the subject. Look all around including the ground. This helps narrow the field of view, yet helps isolate a line or two
Let's break a common rule: hypothetical Rule # 201 - do not put your subject in the dead center of the composition. Well, let's break the heck out of that rule! If you are lucky enough to find a ton of converging lines, change your angle or put the subject in the centre of all those converging lines, then shift your viewfinder to bring the subject into the centre. Now all the lines point to the centre of the composition and to your subject for a dramatic image. I find it fun to look for this, but hard to make it all happen successfully: which is exactly why I try!
Please Note:
There is more than one page for this Article.
You are currently on page 3
- Enhancing Your Perceptive Abilities at Wedding Shoots page 1
- Enhancing Your Perceptive Abilities at Wedding Shoots page 2
- Enhancing Your Perceptive Abilities at Wedding Shoots page 3
- Enhancing Your Perceptive Abilities at Wedding Shoots page 4
1st Published 01/09/2006
last update 09/12/2022 14:53:51
More Weddings Articles
There are 0 days to get ready for The Society of Photographers Convention and Trade Show at The Novotel London West, Hammersmith ...
which starts on Wednesday 14th January 2026


