articles/Review/hugin-page4
Hugin Review - Panorama Stitching - part 4 of 1 2 3 4 5
by Mike McNamee Published 01/04/2013

Here is a rough description of how Hugin works.
1. The first tab is the Assistant and from 'Load Images' you select your JPEG or TIFF images for stitching.
2. For simplicity we chose six images shot on a 12mm focal length lens on the horizontal and 45°-up planes. After this you click the Align button and the software kicks into life.
3. After clicking 'Create Panorama', a Preview Window appears, in this instance with Auto Cropping outlining the proposed trim (in white).
4. In the Preview the arrangement of images is shown. Always worth a check in case the program has confused itself. Claims are made that Hugin does not require the same level of exposure-consistency, levelling, overlap or even focal length that is usually required for stitching programs. With other programs, we have had pews of the church placed up in the roof!
5. The projection tab allows the user to select the projection method from a comprehensive list and each selection is updated in the Preview window.
Here we have chosen Pannini General.
6. The Move/Drag tab allows the user to manually adjust the vanishing point (Vp) of the panorama as shown here; the Vp has been been shifted, note how the curvature of the foreground tiles has been reduced. The Pannini Projection attempts to straighten horizontal features such as these tiles and can effectively do so up to a field of view of 135°. Here we are at over 180° FoV and there is residual curvature

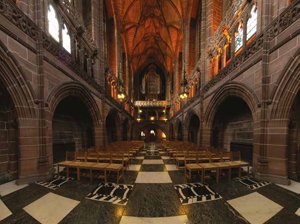
The stitched image. Note that the Pannini General projection has kept the masonry coursing straight although the very wide view has compromised the tiles in the foreground.
7. Once the Vp has been set for a level view, the Crop tab allows for final trimming.
8. The Control Points are generated automatically. The program seeks out lines and surfaces that are straight and puts a marker down at each end of the detected line - the control point. The program then attempts to exploit the information when constructing the assembled image. It does not always succeed, try as we might we could not deliver a whole chair leg for the front, right-hand chair. Sometimes it is quicker to resort to Photoshop to 'mend' such errors.
9. Each of the images to be stitched has its own set of control points.
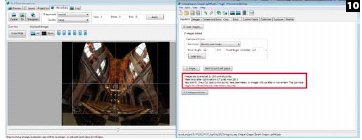
10. The quality of the stitch is measured and numerically assessed here; a deliberately distorted image flags as a failure, with warnings about quality (red outline).
Please Note:
There is more than one page for this Article.
You are currently on page 4
- Hugin Review - Panorama Stitching page 1
- Hugin Review - Panorama Stitching page 2
- Hugin Review - Panorama Stitching page 3
- Hugin Review - Panorama Stitching page 4
- Hugin Review - Panorama Stitching page 5
1st Published 01/04/2013
last update 09/12/2022 14:55:05
More Review Articles
There are 0 days to get ready for The Society of Photographers Convention and Trade Show at The Novotel London West, Hammersmith ...
which starts on Wednesday 14th January 2026


