


articles/Lighting/jack-be-nimble-page1
by Dave Montizambert Published 01/12/2014
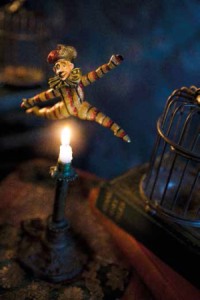
A while back I wanted to create a secular Christmas-like image that displayed all the warmth and magic of this seasonal celebration without stepping on the toes of any religion. With that in mind I selected to interpret the nursery rhyme 'Jack Be Nimble' (see Image 001) with a magical, mysterious aesthetic complete with pyro-technics. Using this image I would like to show you how I did it, with emphasis on lighting, metering (how to meter a small table-top set), and a little Photoshop compositing.
The trick to doing these one-light set-ups is to figure out where to put your single light so that it can do the most for you. In this case I wanted a heavy backlit look that would push all the shadows forward. This is the trick lighting artists use when trying to portray a night scene so that it still looks dark but you still see what's going on. With this in mind, I placed the light behind the set on the camera-left side (see Image 002 B). Lighting such small objects such as Jack with moody lighting is difficult with regular lighting modifiers because they are simply too large. Placing a light just off-camera at the back of the set, then tilting it so that the light spills over the top of the subjects, then placing tiny silver reflectors at the front of the set (see Image 003), allows you to light the subjects with appropriate-sized light modifiers since you can cut these to any size and shape. Pointing the light origin up allows the main volume of light to spill over the top of the subjects allowing only the darker edges of this light beam to actually strike the backs of the subject and props; this way you can more easily control the ratio between the backlighting and the frontal reflector lighting, otherwise the backlighting will always be way too strong compared to the frontal lighting.
To create this image, Jack was suspended by a magic-arm clamped to one of the legs of the barstool that serves as the main table-top surface for the set. This tall stool has a brocade, empty pillow cover draped over its top surface. The books and cage to the camera-right side of Jack also sit on this same barstool and help to hide much of the magic-arm. The second cage and pile of books sitting out of focus in the background are placed on a much lower foot stool. One of my wife's large scarves was taped to the wall behind the set to act as a background. Since Jack would dangle over a candle flame for quite some time, and since he didn't want his crotch fried, Jack requested that the candle be placed not directly underneath, but instead slightly in front of himself, closer to camera. When I asked, "Are not your trousers fire-retardant?" he politely pointed out that "we' no longer call it fire-retardant; political correctness mandates that we call it 'Fire Impaired' and that no, they were not fireproof." Finding his explanation reasonable and because I felt that I should not be conversing with an inanimate object, I obliged. For more details on the set-up, see 'Set-up in Detail' and 'Camera Info'.
Creating magical lighting with just one light, as in this image of Jack, works better and much faster if you create your lighting (ratios) with the aid of a meter rather than doing it by trial and (lots of) error. A handheld meter is the tool of choice; however, temporarily removing your camera from its tripod and setting its internal light meter to spot-mode could work too. To find the best exposure for Jack and to set the lighting ratios accordingly, I pulled out my trusty Sekonic light-meter. However, I had to work a little differently compared to metering for something like a portrait because of the small size of the subject and the close proximity surrounding props. Generally speaking, hand-held meters are too large and bulky for accurate light readings on such small set-ups - I found it impossible to get the white dome of my meter anywhere near Jack's face. I have an attachment for my old Minolta IV meter that consists of a tiny white incident dome on the end of a slim goose-neck that then plugs into an auxiliary port on the meter via a cable for taking incident readings in tight spots. But even this solution is awkward and too large so I long ago scrapped it and the notion that I could get any type of accurate incident readings on tiny sets and opted for reading directly off the subject with a 1˚ spot reflective meter - my Sekonic LR-758DR meter is not only an incident meter, but is also a 1˚ reflective spot-meter; this is very convenient for it allows me to handle any metering challenge with only one meter. There is, however, a downside to working with only reflective meter readings - it requires you to think - you need to interpret or 'zone' the readings. If you are not experienced at zoning you can place a small piece of a middle-grey card against the subject and take a spot meter reading off the grey card scrap - whatever it reads will be the exposure setting you need to correctly expose the tones directly behind the card (see Image 004). By the way, a scrap of white office paper would do the trick too, just remember to compensate by two f-stops since white paper is about two stops brighter than middle-grey - in other words, whatever the reflective meter readout displays, increase this exposure by two stops.


SWPP - Society of Wedding and Portrait Photographers
The Society of Photographers
Clwyd Chambers, Clwyd Street, Rhyl, Denbighshire, LL18 3LA, UK
Tel 00 44 (0) 1745 356935
Home Page - Find a Photographer - Benefits of Membership - Events and Seminars - Who's who - Photographic Trade Directory - About - Qualification Structure - Mentor Me Programme - Professional Imagemaker Magazine Articles - FREE information pack - Privacy