


articles/Lighting/light-part37-page1
by Dave Montizambert Published 01/06/2015
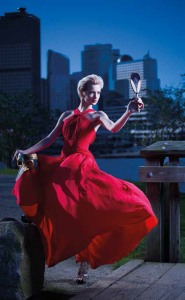
...having fled the city, Narcissarella 1 has removed her mask and is seeing her true self for the very first time, see Image 001-this image of model Kelsey Barnwell is a study in colour harmony, mixed lighting and perhaps an attempt at humour. The job at hand was to create an eye-catching image of this fiery red dress for Vancouver fashion designer, Sam Stringer. Sam made my job easier by sourcing Kelsey and the make-up artist Ana Maria Badila, leaving me to supply the location, lighting, photography and concept (with the help of my publicist/wife Sylvianne). Part of my concept was to contrast the vibrant red of this beautiful creation against a cold blue city skyline - the deep blue sky and its blue light reflecting on the Vancouver city skyscrapers would create wonderful colour harmony with the dress. I wanted everything except the dress to appear cold in image and so I processed the Raw files with a bias to blue (3700˚ Kelvin for colour temp in Lightroom). Kelsey's fair skin with the additional blue balance was perfect-fair skin tends towards blue while darker flesh towards yellow-it helped lend a cold and ethereal look.
For my perfect background, I needed the blue sky behind the camera to create a blue wash of light over the towers of the city. For this to work, it was necessary to pick the time of day when the sun starts to move behind the buildings; this would minimise direct sunlight on their front sides, too much direct sunlight here would negate the cold blue look, see setup in Image 003.
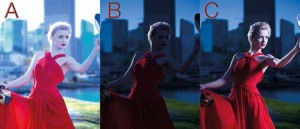
To separate Kelsey and the dress from the background, I chose to shoot at f4 - this aperture created a shallow DoF which threw the cityscape nicely out of focus while leaving it distinguishable as a city. The open sky lighting on the front of Kelsey gave an incident meter reading of f4 at 1/160th of a second at 100 ISO and an incident meter reading of the direct sunlight striking the back of Kelsey read f4 at 1⁄1,000th, see Image 002A shot at f4 at 1⁄160th-this is pretty close to how this scene would photograph if I had set my camera to P for Program or A for Automatic.
To find an exposure of the city, I simply set the camera to f4 then took a number of test exposures bracketing the shutterspeed. A quick look in Lightroom on my tethered MacBook Pro revealed f4 at 1⁄1,600th to be my favourite. An incident meter reading of the backlighting on Kelsey was asking for a longer shutter at 1⁄1,000th, so at 1⁄1,600th the backlighting is recorded at 2⁄3rds of a stop below the camera setting. Due to the back-angle of the sunlight, its brightness on the subject will appear brighter than the incident meter reads-when light comes from beyond 90˚ from the camera angle, it appears much brighter than an incident meter suggests. I was totally happy with the look of this minus 2⁄3 ratio.


SWPP - Society of Wedding and Portrait Photographers
The Society of Photographers
Clwyd Chambers, Clwyd Street, Rhyl, Denbighshire, LL18 3LA, UK
Tel 00 44 (0) 1745 356935
Home Page - Find a Photographer - Benefits of Membership - Events and Seminars - Who's who - Photographic Trade Directory - About - Qualification Structure - Mentor Me Programme - Professional Imagemaker Magazine Articles - FREE information pack - Privacy