articles/Lighting/lightingfordigital4-page2
Lighting for Digital 4 - part 2 of 1 2 3
by Dave Montizambert Published 01/10/2007

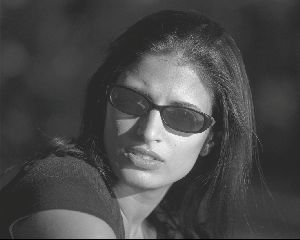
The five images displayed on these pages were created with my camera set to manual and its aperture kept at a constant f4 to maintain a very shallow depth of field. These five images were lit with direct sunlight and no lighting modifiers. Image 02 - shot at f4 at 1/1000 of a second which was a lit-side/shadow-side average exposure setting metered with an incident meter pointed directly at the camera lens - is for my taste way too high in contrast; it would be really nice if you could lower that contrast range to show more detail in the really bright areas and in the shadows. With a little metering, exposure finessing, and access to a decent B&W dark room, one can easily improve an image like this by using the methods from Ansel Adams' Zone System, which allow us to contract or expand contrast ranges for B&W film.
To set the appropriate camera shutter-speeds, I did as Ansel Adams would have done and used a one-degree spot reflective meter; no wimpy I-don't-know-what-value-I-want incident readings for Mr. Adams and definitely no cowardly in-camera-readings set to 'Auto'. Image 02 reflective meter readings are as follows: shadow side of Julie's cheek read f4 at 1/125 of a second and the lit side cheek read f4 at 1/4000 - this is a five stop difference. If all of these numbers are confusing you, please look to Image 06 for a shutter-speed scale.
Any reading you take with a reflective meter can only tell you how to make that area you just read, reproduce as middle grey. This sounds rather limiting, however, this is all we need know; once we know how to make middle grey then we can alter the camera setting to make that metered tone whatever brightness we want.
Now, how does one interpret 'Expose for the Shadow'? Image 03 is a literal interpretation of this; the exposure was set exactly to what the meter read off the shadow side cheek, f4 at 1/125. As you can see, Julie's shadow-side cheek has recorded as middle grey. I decided that I would like it to be a deeper tone than middle grey, a Zone 3 or, as I like to call it, a minus two - meaning two stops darker than middle grey. To attain this I set the camera to a shorter shutter-speed, 1/500 of a second. F4 at 1/125 meter reading exposed at f4 at 1/500 will render that metered tone as two stops darker than middle-grey - a Zone 3/minus two.
Highlight- Ansel Adams referred to the lit-side of a subject/object as the highlight. I am somewhat reticent to call it this because in digital as well as in situations where you are controlling lighting contrast with lighting equipment, the term highlight takes on a somewhat different meaning.
Now that the shadow density is decided upon, I needed to place the litside or as Ansel Adams would have called it, the Highlight (see sidebar - Highlight). The earlier reflective meter reading off the lit-side of Julie's face read f4 at 1/4000. F4 at 1/4000 exposed at the already established f4 at 1/500 camera setting would render that metered tone at a brightness 3 stops brighter than middle grey; a Zone 8/plus three value. At a Zone 8/plus three value Julie's fully-lit flesh will turn out two stops over-exposed if I did normal development, see Image 04 - to be correct, Julie's real-life-in-the-flesh flesh tone (we are talking reality here) should be 1 stop brighter than middle grey. If, however, you process the film for a shorter than normal time, as I did on Image 05, at an N-minus-two development time, the shadow will remain virtually the same and the lit side of the face will drop in value by two f-stops, making it the correct Zone 6 or plus one value.
How does this work? To understand this, you must first understand how light energy and how development chemistry penetrates a film emulsion. Modern film is made up of a layer of gelatin sitting on an acetate base; this gelatin layer contains millions of light sensitive crystals distributed throughout. When light strikes the film, it penetrates the emulsion affecting the light-sensitive crystals. The higher the light intensity is, the deeper it penetrates the emulsion affecting not only the surface crystals but also the crystals deeper within.
Time is a factor too, the longer the light is allowed to expose the emulsion, the deeper it penetrates. Darker areas and shadow areas send less light energy to the film emulsion affecting only the emulsion's surface crystals and few or none of the deeper crystals. The lighter tones send more light energy, so more light strikes the emulsion, penetrating further, affecting not only the surface crystals, but also the crystals deeper within. When light sensitive crystals are exposed to light, their molecular structures are altered. It is only the altered crystals that will have a chemical reaction with the developer and result in density on the film. In processing, the shadows finish developing faster than the highlight. This is due to the rate that the developer penetrates the emulsion. The developer reaches and reacts with the crystals near the surface first, it takes longer for it to penetrate deeper to react with all the highlight crystals. Since the highlight areas of the subject send more light to your film than does the shadow areas, it affects not only the surface crystals but also the crystals deeper within. With normal development times, not all these crystals would be reached by the developer. If you pull the film, taking it out of the developer sooner, less of the crystals will be developed in the highlight area resulting in less density on the film, or in the outdoor scenario we just discussed, the subject's true tonality in the highlight area will no longer appear overexposed.
To summarise, we placed the shadow area at a brightness we wanted it to be (two stops darker than middle-grey) and then brought the overexposed highlight (lit-side) down in brightness from 3 stops brighter than middle grey to 1 stop brighter than middle grey by reducing development time (N-minus-2 pull processing). In essence we actually overexposed and under-processed the film.Now the part in the last paragraph's last sentence where I said "...we over-exposed the film..." this may be a little confusing so let me clarify. If I was not using Ansel Adams' zone-shifting, contrast-reducing system and had used a reflective reading off a grey-card placed on the lit-side of Julie's face, or an incident meter pointed at the sun, then my exposure would have been f4 at 1/2000 of a second, this would render a correctly exposed grey card and a correctly exposed lit-side face when processed normal. Since f4 at 1/2000 is the correct exposure for middle-grey in this scene, then the f4 at 1/500 exposure (image 04) that I took would render this scene (with normal processing), as an over-exposed, highcontrast image.
Please Note:
There is more than one page for this Article.
You are currently on page 2 Contact Dave Montizambert
1st Published 01/10/2007
last update 09/12/2022 14:55:49
More Lighting Articles
There are 0 days to get ready for The Society of Photographers Convention and Trade Show at The Novotel London West, Hammersmith ...
which starts on Wednesday 14th January 2026


