


articles/Lighting/lightingfordigital5-page2
by Dave Montizambert Published 01/12/2007
As I mentioned earlier, digital assigns significantly more bits to the highlight than the shadow. Expressed in brightness levels, digital applies 2,048 levels to the first stop down from pure white at the highlight end of the greyscale (see top graphic in Image [3]). This is half of the available 4,096 levels possible from the 12-bit encoded data. The second stop down uses half again of the available levels, 1024. The next stop 512, the next 256, the next 128, leaving only 64 levels to describe the sixth stop in the shadow.
Sixty four levels sounds pretty bad, but it is more than enough to describe a shadow. However, at 64 levels you may run into trouble if you try to lighten up the shadows to show more detail. Many digital photographers play it safe, under-exposing their captures to ensure highlight detail, then in their RAW processing software or by opening their image in Photoshop, they use the appropriate controls to brighten the image to bring back the mid- and shadow-tones. This method may be a necessary evil in uncontrolled lighting situations, but be aware that if you go too far with 'playing it safe' you can wreak havoc with shadows. When you lighten a file in your image editing software, you are pushing the distribution of bits further up the greyscale, in other words if you lighten the file by one stop, where you once had 64 levels of brightness in the shadow at the sixth stop, you now have half (see bottom graphic in Image [3]). In addition to this, noise, which typically resides in the darker tones, will be emphasised. If you wish to maximise the available bits your camera has to offer, it makes more sense whenever possible, to place the brightest significant highlight as close to burnout as possible and then during processing place the shadow, quarter, mid, and three quarter tones to taste.
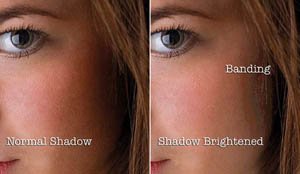
In Image [1] of model, Sarah Madro, the shadows are intended to create a dramatic look and so are quite dark. If you had a change of heart after the fact and decided to lighten the shadows of this 12-bit capture by one stop using curves or levels, the sixth stop shadow tones would only have 32 of the original 64 levels (see bottom graphic in Image [3]). In Image [4], we see a before and after close-up of where the transition from lighter shadow into darker shadow occurs in the cheek to hairline area. In the lightened version, we see this shadow gradation breaking apart (over-emphasised for teaching purposes) - the subtle gradations from one tone to the next are too far apart to create the illusion of continuous tone. This bit of ugliness is called posterising or banding and is as undesirable as cracker crumbs in bed. If you are not sure how dark you want your shadows, then I suggest a higher fill ratio during lighting and then darkening the shadows after the fact during RAW processing or in Photoshop with curves.
Dave Montizambert searches for optimum digital exposure
Therefore, to capture the optimum exposure in digital it makes sense to reverse Ansel's rule to read, 'Expose for the highlights and process for the shadows'. Now that is a pretty bold black and white statement that forgets to mention the quarter-tones, mid-tones, and threequartertones, and it really does not fully address the extended capabilities of photographers who physically create lighting for digital capture. It's all about contrast, more specifically contrast control. Ansel Adams did it with exposure and development because he could not affect the lighting contrast before capture. Studio photographers do it with lighting since they can physically alter the lighting contrast before capture. Therefore I am compelled to make a new big bold black and white statement for those who do control contrast prior to capture, "Place the scene's tones with lighting and then set this manufactured contrast at the optimum exposure by making a hypothetical grey card read middle grey in the raw capture - 113-118 levels for a 2.2 gamma colour space such as Adobe RGB or sRGB or 93-96 levels for a 1.8 gamma colour space such as Colormatch RGB. Huh, that's funny, that is pretty much how I did it with film - I lit for tones and then exposed for middle grey.
Bits, Bitmap, and Bits Per Channel
Pixel stands for picture element. Digital cameras and scanners create bitmap data. A bitmap is a representation of an image using pixels as opposed to vector data that is used to represent graphics which it does using a series of lines or curves that are stored as mathematical formulae rather than pixels. Therefore a digital camera or scanner cannot create vector data only pixel data. Pixels are made up of bits, hence the term bitmap meaning that a digitized image is a map of a series of bits. A bit is a single binary digit - 0 for off or 1 for on. This provides a limited choice of tones, white or black. The greyscale image of model, Sarah Madro, on the top left side of Image [5], confirms that an image made up of one-bit pixels cannot create any tones between pure white and pure black and so cannot create the illusion of continuous tone.


SWPP - Society of Wedding and Portrait Photographers
The Society of Photographers
Clwyd Chambers, Clwyd Street, Rhyl, Denbighshire, LL18 3LA, UK
Tel 00 44 (0) 1745 356935
Home Page - Find a Photographer - Benefits of Membership - Events and Seminars - Who's who - Photographic Trade Directory - About - Qualification Structure - Mentor Me Programme - Professional Imagemaker Magazine Articles - FREE information pack - Privacy