


articles/Lighting/lightingfordigitalpart18-page3
by Dave Montizambert Published 01/12/2010
Reset Densitometer's Sample Size in Photoshop
How many pixels are read under the cursor is an important factor to consider when judging skin-tones by the numbers. For best results in Photoshop, you may have to alter the number of pixels read with the eyedropper tool. Do this by selecting the eyedropper tool from the tool bar, look to the 'Sample Size' field in the 'tool options bar' running across the top of your screen. Most people have this set to '3x3 Average' which averages together the colour values of 9 pixels at a time; this is pretty good but I prefer '5x5 Average' which reads 25 pixels at a go. This does a better job at averaging out stray, incorrectly coloured pixels caused by noise or by interpolation error during the de-mosaic process of raw file processing.
How to Use H&S to Optimise Skin-tones by the Numbers:
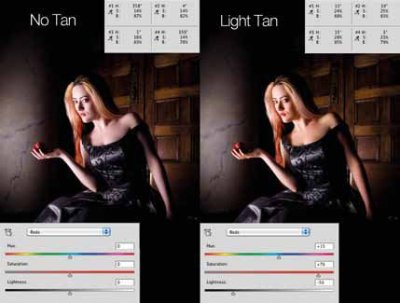
A Hue/Saturation adjustment layer can be created by going to the Layer menu in Photoshop, dragging over 'New Adjustment Layer' and then from the resulting pop-out menu selecting 'Hue/Saturation....' In the resulting dialogue box, type in a name such as 'Skin-tone', now the actual Hue/Saturation slider controls will appear. The Hue/Saturation adjustment controls offer choices over which colour ranges we wish to affect; since human flesh is predominantly red, switch the default 'Master' setting to 'Reds'. Click in the field to the right of the 'Hue' slider so that it is selected, this allows us to alter the slider position by tapping the up/down arrow keys of the keyboard freeing up the mouse cursor. The mouse cursor can now be placed over key areas of the subject's skin-tone so that you can view the resulting Info palette numeric values taken from under the cursor to see how the colour changes compare to what you know to be appropriate flesh-tone ranges. Once the subject's skin-tone is dialed in to a more acceptable hue, move on to the 'Saturation' slider and then the 'Lightness' slider (Lightness is akin to Brightness and Luminance). You can jump from one field to the next by tapping the Tab key on your keyboard. Each tap of the Tab key jumps you to the next field, in descending order, if you want to ascend, hold down the Shift key as you tap the Tab key. I also like to set my sample points in place; do this by selecting the Colour Sampler tool nested with the Eyedropper tool in the toolbar of Photoshop, and then click on key points of the subject. Each click sets down a sample point and a corresponding readout appears in the Info palette. With these set, I click on the miniature arrowhead beside the eyedropper icon for each new readout and switch them all to HSB. With up to four of these set (four is the maximum), you can now watch a range of skin-tone values change as you manipulate the Hue/Saturation Adjustment layer's sliders towards what you think is the 'perfect' skin-tone for that person.


SWPP - Society of Wedding and Portrait Photographers
The Society of Photographers
Clwyd Chambers, Clwyd Street, Rhyl, Denbighshire, LL18 3LA, UK
Tel 00 44 (0) 1745 356935
Home Page - Find a Photographer - Benefits of Membership - Events and Seminars - Who's who - Photographic Trade Directory - About - Qualification Structure - Mentor Me Programme - Professional Imagemaker Magazine Articles - FREE information pack - Privacy