


articles/Lens/marvellousmacro-page9
by Mike McNamee Published 01/04/2007
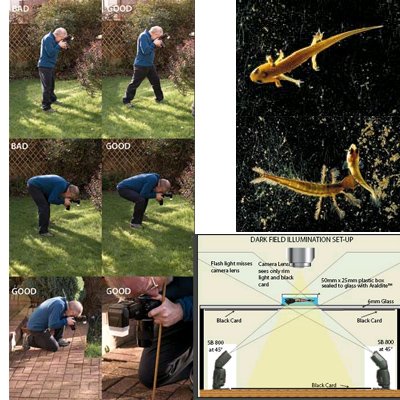
ABOVE: This 'newtpole' is displayed on the page at life size. Shot on film at approximately 1:2 using a Nikon FE and a 105mm f2.8 manual focus Micro Nikkor
ABOVE RIGHT: A dytiscid larvae attacks a small minnow. These fearsome, heavily armed larvae change into the diving beetles.
ABOVE: Two larvae of the common darter, showing both the top view and the underside. The upper larvae has a small leech hitching a ride!
DARK FIELD ILLUMINATION
This is a technique taken directly from microscopy and adapted for macro nature use. The ease with which it can be set up belies the striking nature of the images you can produce. It is not just limited to live, aquatic insects but may also be used to great effect for thin slices of fruit such as kiwi-fruit. All you need to build a set-up are a camera, macro system, two flashguns, a sheet of glass, some black card and some Araldite. The diagram explains the lighting arrangement. The characteristic effect is produced because only rim-lighting reaches the subject. If the subject is thin and/or translucent, so much the better. If you fill the 'aquarium' with just a shallow depth of water, the subject is unable to move in and out of focus. If the aquarium is kept small then you force the subject to stay in, or close, to your field of view, thus guaranteeing more chances of usable shots. Despite this, if you take on tadpoles and froglets expect quite a lot of fun and a requirement for some saintly patience, they can easily climb or hop out! In the examples shown, real pond water has been used, complete with filamentary algae and quite a lot of un-identified detritus. If this is confusing your image then you might try rainwater. Exposure judgement has to be from the camera histogram as it is impossible to predict how the rim-lighting is going to affect the subject - much easier with digital than film, of course!
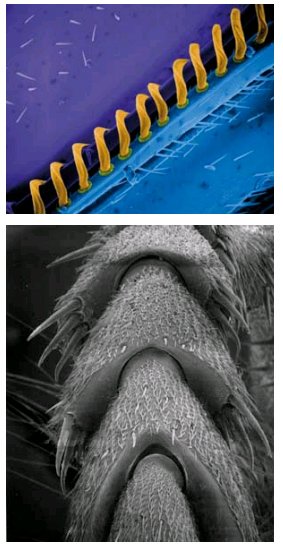
SCANNING ELECTRON MICROSCOPY
This part of the article is not about macro but real micro! When you run out of steam with visible light, the only way to get more depth of field, resolution and magnification is through the electron microscope. Here a stream of electrons are directed at parts of a wasp that have been specially coated in palladium to make them conduct electricity. The top, false-colour image shows the hamuli, which link the front and rear wings of the wasp so that it can create more lift when it flaps its wings, just like a jumbo jet lowering its flaps for landing. The hamuli (yellow) clip the leading edge of the rear wing to the trailing edge of the front wing, the clasp-like shape allowing rotation but, when required, the wasp can un-hinge the wings totally for cleaning.
On the right, the intricate front leg assembly of the wasp at 120x full size, a remarkable feat of miniature engineering!


SWPP - Society of Wedding and Portrait Photographers
The Society of Photographers
Clwyd Chambers, Clwyd Street, Rhyl, Denbighshire, LL18 3LA, UK
Tel 00 44 (0) 1745 356935
Home Page - Find a Photographer - Benefits of Membership - Events and Seminars - Who's who - Photographic Trade Directory - About - Qualification Structure - Mentor Me Programme - Professional Imagemaker Magazine Articles - FREE information pack - Privacy