articles/Photoshop/photosjop4beginners-page1
PhotoShop 4 Beginners Levels and Curves - part 1 of 1 2
by Mike McNamee Published 01/08/2010

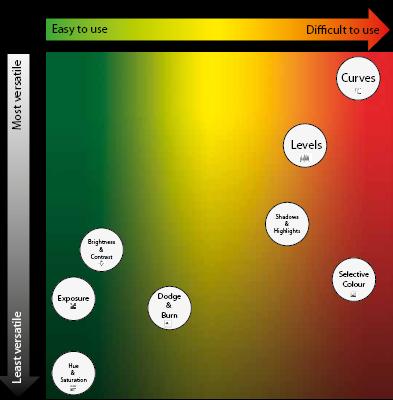
Graph showing difficulty levels and versitility of methods and tools
The newcomer to Photoshop is likely to be confused by much of what is placed before them. Almost everything that you tackle may be accomplished by about five different methods and there is a general confusing babble about which is the most effective way. Adjusting tone range and colour are two such tasks. Although they are effected by the same tools, these tools are used in different ways and so it is sensible to divorce the discussions from each other. For the monochrome worker, of course, only tone range, not colour is of importance.
The main tone adjustments are made through either the Image>Adjust dialogues or via Adjustment Layers. Both sets are similar but not identical in every aspect and feature. Adjustment Layers have the advantage of being non-destructive to the pixels of an image; you can go back, re-open the dialogue panel and make further adjustments to the original pixels.
Adjustment Layers also have masks attached to them by default, and this allows the user to control where in the image an adjustment will take place and its strength.

The grid is an attempt to put the various methods into some kind of perspective. For example, the Exposure slider is very simple to use; it makes the picture darker or lighter and if that is all you wish to do then it is fine. At the other side of the grid, Curves are very sophisticated and can be used for precise tone level and colour adjustments.
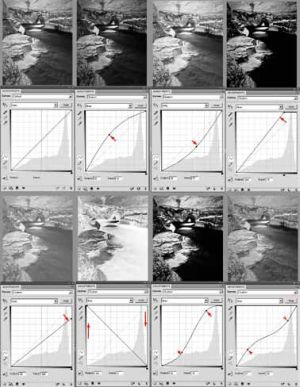
Curves are the most flexible option. They may be shaped to 'mould' the tones so that wet rock can be made to look wetter, or cloudy skies look more dramatic. There are a number of classic shapes which are illustrated in the diagram, along with the effect that they have had upon the tone range of a monochrome image. In all the examples either two, three or four control points have been used. When two are used, only the slope of the response line is altered and the contrast is either increased or decreased along with a change in the end point values (that is the highlight and/or shadow values). When three are used, the centre control point bends the line into an arc which changes the middle tones most, leaving the end points unaltered. When four are used the straight line is bent into a 'shape' so that the contrast in different parts of the tone range are separately adjusted. It is possible to employ as many as 15 control points but care should be taken to keep the curve smooth unless posterisation is desired - that is why there is a smoothing button in the dialogue panel.
LEVELS
While Levels are not quite as sophisticated as Curves, many people prefer to adjust their images to avoid clipping using this panel (see call-out on clipping). Indeed the clipping warnings are only activated when Levels sliders are in use. The clipping warning is toggled on by depressing the Alt key while clicking the mouse on the highlight or shadow slider. If the clipping warning is turned on via the drop-down menu of the panel then it appears as soon as the slider is clicked. In colour images the warning even shows which channels or combinations of channels are clipped - white represents all channels clipped.
You are currently on page 1 Contact Mike McNamee
1st Published 01/08/2010
last update 09/12/2022 14:57:54
More Photoshop Articles


