


articles/Photoshop/quickmask-page1
Published 01/03/2001
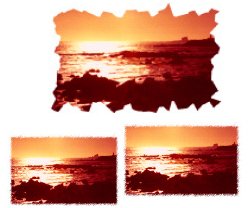
Have you ever wanted to create almost unlimited amounts of creative borders, or effects. Simply use Quick Mask and Filters.
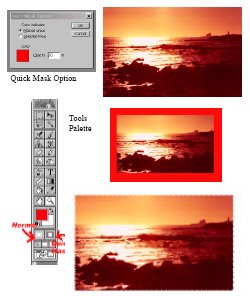
Quick mask can be found at the bottom of the Photoshop tool palette. When you double click on the quick mask option the selected areas are painted red. Depending on the level of opacity that you have set, the image is either completely covered or opaque. If you desire, you can also change the masking colour to whatever colour or shade you like.
Step one
Open your image
Create a rectangular selection around a part of your image. Enter the Quick Mask option from the tools palette.
Step two
While in the Quick Mask mode go to the filters menu and apply one or more filters. The filters will only affect the masked area the image will remain at this stage unaffected.
Step three
Click on the normal mode icon on the tools palette. You should then see an outline of what is selected.
Step four
From the edit menu at the top of the screen 'copy' (Ctrl C) selection. Then from the file menu go to 'new' (Ctrl N). Photoshop will automatically enter the dimensions of the image that you have copied.
Step five
Simply paste (Ctrl V) into the new document. Remember a new layer will have been created so you will have to flatten the image. You will be able to save your image in whatever format you choose.


SWPP - Society of Wedding and Portrait Photographers
The Society of Photographers
Clwyd Chambers, Clwyd Street, Rhyl, Denbighshire, LL18 3LA, UK
Tel 00 44 (0) 1745 356935
Home Page - Find a Photographer - Benefits of Membership - Events and Seminars - Who's who - Photographic Trade Directory - About - Qualification Structure - Mentor Me Programme - Professional Imagemaker Magazine Articles - FREE information pack - Privacy