


articles/Photoshop/sharpening-page2
by Mike McNamee Published 01/08/2004
Preferred Sequence for Sharpening
There are preferred strategies and sequences for the application of sharpening. They are listed below as guidelines - by all means break the rules but do some from a position of knowledge.
1 When judging your sharpening have your image at 100% or 200%.You get 100% quickly by double clicking the Zoom Tool at the bottom of the Tool Bar.
2 When the USM dialogue box is open you change which bit of the image is previewed by clicking on the main image. Use this to check over your image in different parts. The correct value for the eye lashes may be too much for a model's complexion.
3 Do not apply sharpening before changing the size of an image.
4 Leave sharpening as the very last step before output of the file.
5 Sharpening will be needed after operations which recompute pixels, e.g. rotation, scaling, sizing.
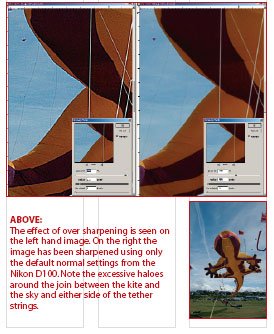
6 Beware of over-sharpening subjects such as landscapes and portraits in an unsympathetic way.
7 Do not sharpen files that are going to be subsequently scanned. Sharpening will be carried out by the vendor performing the second scans e.g. if you image a file as a transparency and send this for scanning at the printers.
8 In order to prevent blotchiness of human skin it can be very effective to individually sharpen the R G and B channels. The amount can be tailored for each channel. The total amount should be low (80% to 120%), the radius should be large (1.8 to 2.5) for resolutions between 300 and 400ppi.The threshold should be set according to the graininess of the image.
9 For shots of machinery, the amount of sharpening can be high, as much as 220% to enhance the apparent sharpness of the equipment. Over sharpening will however still result in loss of detail.
10 After sharpening, if you go straight to Edit>Fade Unsharp Mask, you can reduce the effect (Shft-Ctrl F is the short cut)
This is a technique which has many devotees. You take your layer, duplicate it, run the high pass filter with a radius of 10, set this duplicated layer to hard light and adjust the layer opacity to get the level of sharpening required (usually between 20% and 70%).This gives a real time ability to back off or mask off the effect. A radius of 10 is like using a radius of 10 in unsharp mask - it may not be appropriate for all images. Try other radius settings more like 1, 2 or 3.You can also use Overlay or even Soft Light instead of Hard Light for more subtle sharpening. You can use a layer maskto apply the sharpening to a local area or paint directly into the layer with 50% grey to control the application of the sharpening. When you have a somewhat larger radius you can run the median filter on your "sharpen" layer to kill any grain enhancement introduced by the High Pass filter. Dodge and burn on the High Pass to "contrast up" local areas of sharpen.Use curves on the sharpen layer - peg the midpoint and ramp up the white point independently of the rest of the curve to adjust the intensity of just the lighten halos; same thing with the black point. A variation is to duplicate the file, convert to grayscale and run the "Find Edges" filter. Invert, soften with Gaussian Blur and adjust levels to control the contrast.Then load that into the main image as a selection and sharpen. This has a reputation for protecting all the shadows, severe highlights and smooth areas and only sharpens the edges. There is a ton of advice such as that above on the web. When we Googled for Photoshop Sharpening we were still on relevant stuff after 130 hits.
SOFTWARE SOLUTIONS
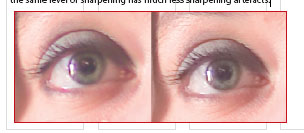
For the really enthusiastic sharpener there are a number of products on the market, which bundle all the available technology into one a single place. Foremost amongst these is nik Sharpener, reviewed by Andrew Williams a couple of issues ago. With the benefit of hindsight (i.e. the published magazine) we can see that Nik Sharpener actually did a marginally better job even though the test will have been compromised by resizing in the page layout. It would seem that, providing the image is sharpened for the job in hand, the program does indeed do a better job. The software company, nik Multimedia also make Dfine, which is aimed at producing a better job of removing noise and JPEG artefacts. The literature with the program is very persuasive and the case well argued. However these are refined methods and we hark back the what we said earlier - the image has to be first class to start with otherwise these refinements will be quite lost in the general fuzz of the image. It is also noteworthy that Photoshop now has additional sharpening expertise in its RAW file plug in. The image on the left has been strongly sharpened and magenta fringing is visible around the highlight. With Luminance Smoothing and Color Noise reduction, the same level of sharpening has much less sharpening artefacts.


SWPP - Society of Wedding and Portrait Photographers
The Society of Photographers
Clwyd Chambers, Clwyd Street, Rhyl, Denbighshire, LL18 3LA, UK
Tel 00 44 (0) 1745 356935
Home Page - Find a Photographer - Benefits of Membership - Events and Seminars - Who's who - Photographic Trade Directory - About - Qualification Structure - Mentor Me Programme - Professional Imagemaker Magazine Articles - FREE information pack - Privacy