articles/Printing/simpleprinting-page4
Simple Printing? - Printing Simplified? - part 4 of 1 2 3 4
by Mike McNamee Published 01/10/2004

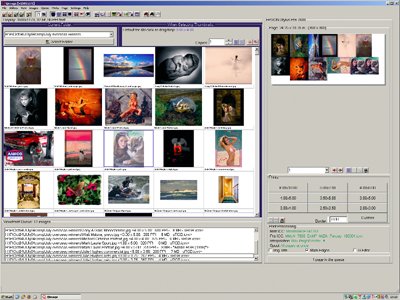
As shown in the screen grabs the source files are displayed as thumbnails in the top left view. They are loaded on the page to be printed by double clicking the thumbnail. If duplicates are required, double click the required number of times to keep adding copies. The sizes may be selected from the default button on the right, changed at will, or bespoke sizes set up. The arrangement on the page is optimised automatically for minimum paper wastage and efficient trimming. However you can set your own spacing rules should you wish to make special templates.
The colour management is set up in a separate dialogue box and remains "sticky" once set. This is a huge advantage over the Photoshop Dialogue box, which sometimes seems to have a will of its own (it is logical but sometimes you are hard pressed to fathom, it out!). Profiles and rendering intent are also set here and remain even if the media is change downstream (hurray!!)
When "print" is clicked the familiar printer dialogue boxes pop up and your other setting may be applied. Printing with Qimage is slightly slower than printing directly from Photoshop but because the files are linked rather than embedded, they are only spooled as needed, thus eliminating some of the resource problems discussed in this feature as claimed by the users.

In addition to the printing facilities, Qimage will also generate slide shows from chosen sets of images, which can be set to display the slide reference number, file name date and time.There are facilities for converting RAW files, sharpening and colour adjusting.The latter can be done via curves, levels on a saturation, or even channel-by-channel basis. Also included are a cropping wizard and a red-eye removal facility.
The level of sophistication of such an inexpensive program is really quite astounding.The software can be downloaded from http://www.ddisoftware.com/qimage
The Print Direct to ILFORD Galerie Driver
This is a utility available from Ilford. Essentially you install a virtual printer in your "Printers and Faxes". From then on when you wish to use (for example), your Epson 2100 with Ilford paper you choose the "Galerie used with Epson 2100" printer from the drop down list. Now when you get to the properties box you are confronted with icons which look like the box of Galerie paper in your hand and that is how you make your selection. It really is that simple! In the background the driver takes care of selecting the icc profile which is installed with the printer and out pops a very accurate print.
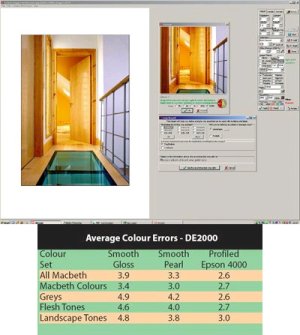
Whilst the choice of surfaces is limited to either Galerie Smooth Gloss or Galerie Smooth Pearl the results are quite outstanding - probably the best we have ever measured for the combination of a generic profile with a non-OEM media. Add to this the fact that these are inexpensive papers with a good reputation and you have a marriage made in heaven! Highlights from the statistics are tabulated below and for reference the data for a bespoke profiled Epson 4000 are also shown. The error measurement is Delta E 2000.We expect to get between 2.6 and 3.3 for bespoke profiling so the Smooth Pearl is a really good result. Visually the two prints were almost identical. The Pearl had about 5 RGB points more discrimination in the deepest shadows and a slightly deeper final black. The all-important flesh tones were almost perfect in the Pearl, slightly desaturated and slightly magenta in the gloss. This difference was just detectable in the controlled light, viewing booth.
NOTE: This review was written before Ilford went into administration.They have promised to maintain supplies of their inkjet media but the position is naturally uncetain.
Please Note:
There is more than one page for this Article.
You are currently on page 4
- Simple Printing? - Printing Simplified? page 1
- Simple Printing? - Printing Simplified? page 2
- Simple Printing? - Printing Simplified? page 3
- Simple Printing? - Printing Simplified? page 4
1st Published 01/10/2004
last update 09/12/2022 14:58:57
More Printing Articles
There are 0 days to get ready for The Society of Photographers Convention and Trade Show at The Novotel London West, Hammersmith ...
which starts on Wednesday 14th January 2026


