articles/Lighting/softretrolighting-page1
Soft Retro Lighting - part 1 of 1 2
by Christopher Grey Published 01/08/2010

Photography as a medium went through some astounding changes in the 1950s. Studio strobes were more commonplace, although rather dangerous, and softer light began to replace the harder light popular in previous decades. Colour film stocks, both film and paper, were significantly improved, and, as more photographers worked in colour, costs came down.
Arguably, the greatest contribution we saw from the fifties was not to colour photography, but rather to the national colour palette itself. After the drab years of war and rationing, America went design and colour crazy, with pinks and greens leading the way. One of my favourite movies from that era is Forbidden Planet, a 1956 epic about an invisible menace on a distant planet. Set on the mythical Altair IV, a space ship lands and meets a reclusive scientist and his beautiful (what a surprise) daughter. Strangely, their home is decorated in many shades of pink and green, from the flat, 50s-style couches to the costumes. This colour palette was assimilated by many other countries as well, as any quick look at vintage beauty books and magazines will show.
In print, art directors often favoured backgrounds and props similar in colour to the wardrobe a subject would be wearing. It may seem odd at first because today's backgrounds are generally more sedate and neutral, but the effect is quite striking and should be used to set the stage for a believable retro portrait.
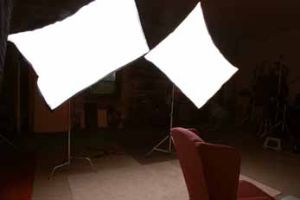
I began my first set by centring two large softboxes about four feet in front of the chair my model would be using as a prop. The boxes were placed at diagonals to each other, overlapping slightly at the bottom corner.

The size of the softboxes guaranteed a very soft light. Even though the chair itself was only about four feet from the background, the size of the source meant any shadow would be so soft as to be unrecognisable. Tipping the boxes diagonally allowed me to shoot through the "tunnel" and from behind the lights.
After my lights were placed, I metered each other separately, with the other completely turned off, from where my model's face would be. Once the first light was set to an f-stop that I liked, it was turned off. The remaining light was adjusted to the same power and f-stop. The first light was turned back on and both lights were metered together to produce the working aperture, f13 in this case.
Once the model was out of make-up and into her wardrobe, the exposure was metered with her in place and the chair was moved slightly so her face would receive a perfect f13.
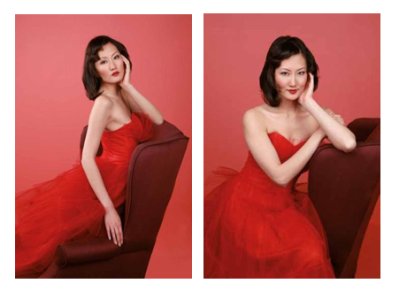
I've worked with this model many times (you may have noticed her on the cover of Christopher Grey's Advanced Lighting Techniques) and I enjoy her sessions not only because she's intelligent and lovely but because she's capable of a range of attitude that eludes many others, and can produce those looks at will. This first image was made with only the two softboxes.
Next, I added a medium softbox at camera left, placing it closer to the background than the model. I wanted to create a very soft, almost unseen, highlight on her side, so the new light was powered to the same f-stop as the two main lights. Given the wraparound nature of the two softboxes, the only places the highlight is visible is where it crosses light from the mains - almost nowhere. Light plus light equals brighter light.
Before we go any further with coloured backgrounds, let me show you an easy way to contemporise a shot like this
You are currently on page 1 Contact Christopher Grey
1st Published 01/08/2010
last update 09/12/2022 14:59:05
More Lighting Articles


