articles/Photoshop/straight-page1
Now let's get this straight! - part 1 of 1
by Mike McNamee Published 01/06/2007

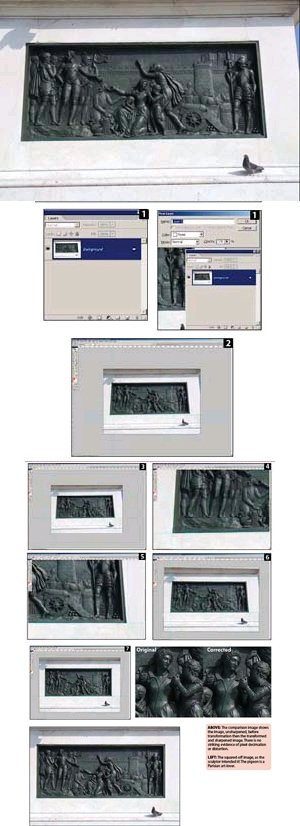
The problem is one we all face from time to time. A beautiful window, a memorial frieze, whatever - they are always too high! In the absence of a rising-front lens/camera, pointing the camera upwards, to get in all the view, results in key stoning. To cap it all, the shot is probably not level and you are not quite centred, so the left side is a different size to the right side! The shot would look so much better all squared off.
Here is the solution:
1. In the Layers palette, double click the background and convert it, by default, to Layer 0.
2. Decide which point you wish to keep fixed and drag vertical and horizontal guides to coincide with that point. At the same time ensure that you have space around your image by clicking 'Ctrl -' until you can see enough.
3. Add guides to the other sides of the 'rectangle'. In our case we also stretched the space upwards to correct the perspective effect of the low viewing angle.
4. Hit Ctrl T to activate the Transform Tool. Drag the control point to the bottom left corner, onto the intersection of the guides.
5. Move the image so that you can view the right-hand/ base guides intersection. Highlight the Rotate entry box of the context-sensitive menu bar at the top and use the up or down arrows to accurately align the corner.
6. The base is now level. Note that in our case it was only 0.8° out of alignment - it always looks a lot more!
7. Zoom out until you can see the upper guides using 'Ctrl -'
8. Holding down the Ctrl key releases the constraints on the Transform tool, allowing the user to move pixels in any direction side-to-side or up and down. Some juggling about is inevitable but as long as you do not hit the enter key or the commit transform button, you create the minimum of pixel damage. Sharpening should now be carried out.

In Photoshop files Big Data consists of those pixels that lie outside the boundary of the image but are retained when the file is saved. In the example shown the perspective of the arches of the Mezquita is in need of some significant correction [1]. Pulling the sides vertical is insufficient and would leave the arches looking too squat. However, when stretched, the castellations seem to be lost [2]. However, the data that is cross-hatched in is big data and is retained [3]. When the image has its canvas expanded, the big data is shown to be there all the time [4].
A word of warning! Big data is only saved with .psd and .tif files. If you save as a JPEG file the big data is cropped during the save process. Big data can swell the size of a file (it still has to be stored even though it is temporarily invisible). If you need a tif or psd but wish to reduce the file size, you can click Image>Trim which deletes big data [6].
A Tip! A little tip was taught to us by SWPP member, Paul Atkins. If you are reproducing a painting and you look up its size in the museum catalogue, you then know the proportions and can accurately judge how far to correct for perspective in the vertical direction. Remember you may also set up guides on the grey 'pasteboard' outside your image to assist this process.
You are currently on page 1 Contact Mike McNamee
1st Published 01/06/2007
last update 09/12/2022 14:59:23
More Photoshop Articles


