


articles/Digital/takingpulse-page1
by Mike McNamee Published 01/02/2005
This is a new, comprehensive colour management tool from one of the major players in the field (some would hold the major player in the field!). X-Rite have been slow to join the "lower end" party but seem to have benefited from their late start with a product which has none of the wrinkles exhibited by its competitors.Colour
The Concept
This is a profiling kit, which enables the user to profile their entire workflow from camera and scanner through their monitor and out to their output device.The greatest improvement you are likely to see is in your inkjet output and within that, your monochrome neutrality. In round figures you can expect to improve your colour error by a factor of between 100% and 500% using a bespoke profile.The size of this improvement depends largely on where you start. Whilst the Epson large format printers such as the 4000, 7600 and 9600 are "D2" machines with a manufacturing tolerance of 2 delta E, if you ply them with fine art papers from a variety of sources you will need more control than you can achieve without a profile. For desktop printers (of all makes) you can expect larger variations and it is a matter of luck where your machine falls in the overall population statistics. However, in our experience, even the most wildly behaved machine will be brought to heel with a bespoke profile!
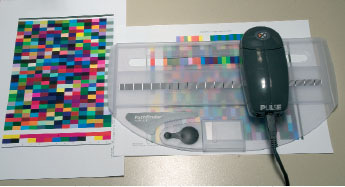
The profiling process works in the same manner for all devices. You measure a set of colours, compare them to a standard set and then build a profile, which pulls the colours into the right spot. The measurement may be made with a spectrophotometer or a colourimeter. The former is best for print profiling, the latter is best for screen calibration; some systems use only one, a bit of a compromise. Pulse uses both. For a printer profile, you print a target (usually between 1 and 5 sheets of A4) let it dry and then measure it. The number of colour patches you measure affects the precision of the profile - more patches are usually better. In order to measure typically 729 patches the spectro must pass over the patches in the correct order, dwelling over each for sufficient time for measurements to be made at about 10 wavelengths. Traditionally this has been done with sophisticated x-y tables or roller-driven transport systems. One of the major cost savers with Pulse is that transport has been taken over by the operator's hands - which comes free of charge! In order to assist, a cradle has been designed which constrains the spectro to run along a line of patches and (cleverly) measures the speed of movement so that the natural slowing of the arm at the end of the travel does not fool the system. No doubt the advances in electronic and the speed of data transfer of USB 2 have allowed this method to be employed. The system is even clever enough to enable you to traverse in either direction and to go back and fill in missed lines of patches.
In Use
The software is a dream to use; it could not be simpler. Just in case you have not seen it done, there is even a video clip explaining how to push the spectro up and down. The profile building is entirely wizard driven; you simply do as you are told, when you are told! You start by making a single A4 sheet of 343 patches or, for more precision, 2 A4 sheets of 729 patches. You then allow the prints to dry.Dye inks need to be left over night, pigment inks (e.g. Epson Ultrachrome) are instant dry, but we usually give them 10 minutes or so to be sure.
The prints are stood on a couple of sheets of the same stock if they are thin, so that the colour of the bench does not interfere with the readings. Art papers are thick enough not to need this precaution. The plastic cradle is positioned over the ID strip and measured first. Then, each row is measured by clicking the spectro button, waiting for the beep then running it smoothly along the strip. A reassuring beep tells you the row has been captured and the on-screen display is also changed to show it has been measured.You then move down a strip and repeat the process until you get to the end. You are then prompted to make and name your profile, which is automatically placed in the correct location. It really is that simple!
The spectro takes its power from a powered USB 2 port, which also charges the on-board battery. There is sufficient battery capacity and memory to make 10 profiles with the spectro untethered. This makes it easier to handle and also allows for shop floor measurements to be made. Then, when you return to the host computer you simply transfer your data and build you profiles in the usual way.
Performance
We tested Pulse against the very much more expensive X-Rite DTP41 and Monaco Profiler and against Monaco EZcolour, using our colour audit process as the arbiter of quality and accuracy. Be alert to the fact that most profiling software reports a colour average error after profile making. This is a measure of the compromises that the mathematics has had to make to fit the patches into their positions and a value of 0.5 to 0.9 is normal. This is not the same value as that which you obtain by running the profile out into a real print where the values are more typically 4 to 8 on the same Lab Delta E scale. It is this latter measurement we concentrated on for that is where the rubber hits the road! We built profiles from the same printer using the same paper stock and then ran the audit prints through our calibrated DTP 41 spectro.
The results from Pulse were impressive. Consecutive profile builds produced print errors within a couple of hundredths of a point of each other and the difference between the Pulse and DTP 41 was no more than a few tenths of a point. We chose to test on a new paper from Konica, which has the highest loading of brighteners we have measured, a severe test indeed for the uv rejection filtering of the Pulse system. Results from EZcolour were inferior to Pulse and the price difference is well worth paying if the output is for professional use. The issue we have with EZcolour is that you employ your scanner as a colour measuring device.This leaves you at the mercy of scanner metamerism, which pigment inkjet prints are particularly susceptible to.


SWPP - Society of Wedding and Portrait Photographers
The Society of Photographers
Clwyd Chambers, Clwyd Street, Rhyl, Denbighshire, LL18 3LA, UK
Tel 00 44 (0) 1745 356935
Home Page - Find a Photographer - Benefits of Membership - Events and Seminars - Who's who - Photographic Trade Directory - About - Qualification Structure - Mentor Me Programme - Professional Imagemaker Magazine Articles - FREE information pack - Privacy