articles/Digital/thehandismightierthanthemouse-page2
The Hand is Mightier than the Mouse - part 2 of 1 2
by Mike McNamee Published 01/12/2002
Another confusion to Photoshop 6 uses is the placement of the brush shape and hardness. To access this you click on "Brush Tip Shape" with the expanded view turned on. Here you may also change the spacing of the brush. Note that you can interactively change the size of any brush by clicking on the square bracket keys and that if you hold the shift key down while doing so you can also interactively change the brush hardness. You can see the change in hardness in the icon on the top menu bar. Not all brushes react to this change.
Making a Water Colour Ragged Edge
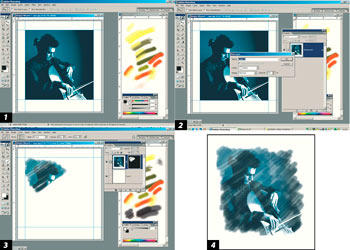
Below is a list of the steps to perform this task. Also look at the screen grabs and captions.
- Open the image and ensure that there is a plain white border around it
- Drag Guides to define the edge of the starting image.
- Double click the Background in the Layers Palette and change it to the default Layer 0.
- Make a new layer, drag it below the Layer 0 in the Layer stack and fill it with white.
- Click into Layer0 then add a layer Mask to Hide All. The image will vanish.
- With the Layer Mask active paint in it with a brush, using white as your Foreground colour. Try a 39 pixel Spatter Brush with an Opacity of 50% and a flow of 66% for starters.
- Carefully paint white onto the mask to reveal your image and use loose sweeping strokes to obtain the effect you require.
- If you don't like the effect fill the layer mask with black and start again. You could also try changing the colour of the white Layer 1.

1. The work image and scratchpad open side-by-side and the guides dragged to identify the edges of the image later.
2. The Background Layer is made into layer 0.
3. A layer mask has been made on Layer 0 as Hide All (black) and is being painted onto reveal the image.
4. The final reworked image. The loose brushing on to the mask creates an equally loose painted feel to the final image.
Please Note:
There is more than one page for this Article.
You are currently on page 2 Contact Mike McNamee
1st Published 01/12/2002
last update 09/12/2022 14:59:41
More Digital Articles
There are 0 days to get ready for The Society of Photographers Convention and Trade Show at The Novotel London West, Hammersmith ...
which starts on Wednesday 14th January 2026


