


articles/Portraiture/williomsportraitlighting-page1
by Mike Williams Published 01/06/2008
Part 2 - "The Eyes have it"
Following from my last article on Studio Lighting, I feel I should go into more detail on the placement of light on the face.
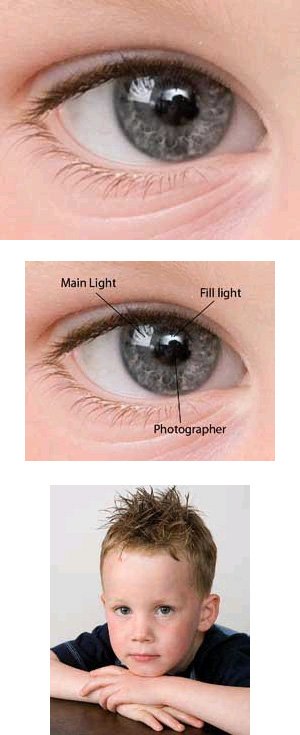
It's all to do with painting shadows on the face, and then adding sparkle in the eyes. If you look at great portraits and wonder how they created that effect, just look at the eyes and as long as no major retouching is done you will see the set up of the lights reflected there. The eyes act like mirrors. This is a great way to pick up tips on lighting.
So after mastering the basic lighting set up, you will need to refine your light angle and height. As in my last article, choose your lighting style (e.g. narrow, broad light, etc.) Then move the light up and down and watch the sitter's eyes closely. You will see the iris go from dull dark to bright and the colour in their eyes become bright or more fully saturated. This is the optimum lighting angle in terms of height. In any photograph your eyes are always drawn to the area of highest contrast, in a portrait this should be in the eyes, the white of the catch light and the black of the pupil.
Tradition has it that only one catch light should be visible in the eye and these traditionalists insist that any other catch light should be removed. My advice is learn the rules, then, when you know better, modify them to taste to taste.
Use the sitter's eyes to fine tune your lights and reflectors, but do not stare at the sitter too hard, you might get strange looks and reactions.
Use reflectors (White, Silver, and Gold) to add drama and sparkle into the portrait. A reflector can be any material that reflects light from state-of-the-art, purpose-made, framed reflectors, to a simple piece of card or paper. In this article I used a piece of card with baking foil crushed up and glued to it. Your should always check the colour of your reflector to ensure balance with your main light or, as with a gold reflector, that it has the effect that you desire.
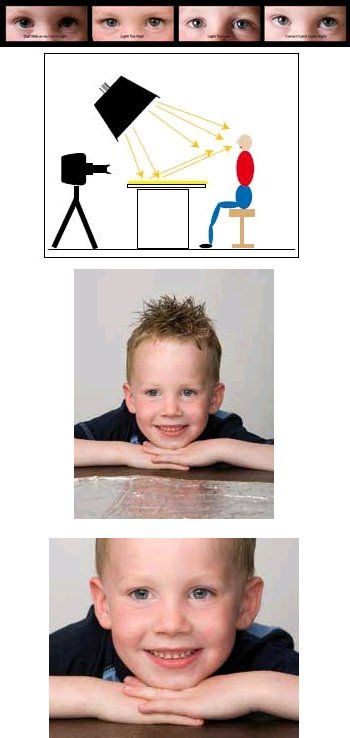
For a general filling of shadows, a starting position for your reflector should be on the opposite side to your main light and not past the sitter.
For a more dramatic, glamourising effect, use the reflector from below and place your light above to give a butterfly light effect. Ladies, in particular, like this effect, as lines on the face are reduced and sometimes removed hidden altogether.
Portrait lighting is an ongoing development of your skill as a photographer, the topics I have covered here are equally relevant in outdoor portraiture or weddings, it's all about mastering the skill of Painting with Light.
I do hope that this short feature has helped you to gain the basics in studio lighting. For those of you who would like more details of the Training Days I run, please phone me or email for an update of forth coming events. A maximum of 10 delegates per session. I also run one-toone sessions at my studio for you to see how a working studio operates or I can quote for me to attend your studio.
Mike Williams Portrait Studio
01745 560633


SWPP - Society of Wedding and Portrait Photographers
The Society of Photographers
Clwyd Chambers, Clwyd Street, Rhyl, Denbighshire, LL18 3LA, UK
Tel 00 44 (0) 1745 356935
Home Page - Find a Photographer - Benefits of Membership - Events and Seminars - Who's who - Photographic Trade Directory - About - Qualification Structure - Mentor Me Programme - Professional Imagemaker Magazine Articles - FREE information pack - Privacy