


articles/Weddings/adobealbumdesign-page2
by Tom Lee Published 01/10/2009

Lurking alongside and within all the programs is the fabulously useful Kuler, again more on that later!
By way of example let's follow the journey of a file set onto the page of an album. In looking for a suitable floral frame, we chose one from the clipart of CorelDRAW 14 [1]. Right away you are confronted with the issue that Adobe are four versions behind Corel on their import filters - you have to use stealth and get the vector art across using the clipboard. First then open the file in CorelDRAW then copy it to the clipboard [2]. This is then pasted into Illustrator [3]. Note that this transaction is not guaranteed. In about one case in 10 you will find that the Corel file is changed, usually too 'filled-in' in the odd place. You have to live with this or repair it manually yourself, it depends upon how the Corel file has been made.
Note that the colour theme of the artwork is autumnal. Clicking 'Recolour Artwork' reveals the palette of colours in use, in a vector illusration these are usually quite a small number [4]. If we wish to change this we click 'Link Harmony Colors' [5]. Now we are able to change the key hue with the hue slider. This rotates all the linked colours around the colour wheel, maintaining the harmony relationship. You may also change the brightness and or saturation globally [6]. This ability is a key feature of Illustrator; you can take available artwork and remix the colour theme to match the album you are designing, a process that is almost impossible in Photoshop is carried out in seconds!
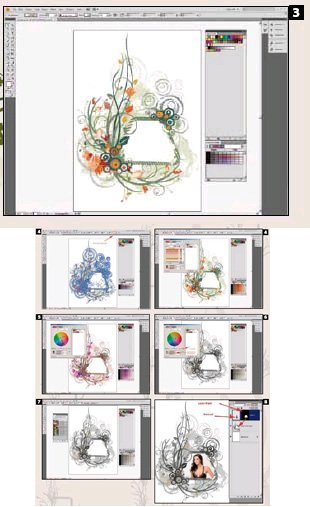
When you are happy with the result [7], the artwork is copied to the clipboard then pasted into a Photoshop file (usually the same size as the album page). Equally it could be pasted into an InDesign page depending on your intentions or, for continued use, it could be placed into the InDesign Library. We have used 'paste as a Smart Object' in Photoshop. In this case the smart object of the floral frame is used to create a selection and then a layer mask to 'contain' the portrait within the correct boundary of the artwork.
This is the simplest way of using a piece of vector artwork. However, it can be placed directly into InDesign. If the objects are copied to the clipboard, and then pasted, they stay as editable paths. It is also possible to save the artwork file as an Illustrator .ai or a pdf file and then 'place' this file into InDesign. In this case it is scalable but not directly editable. If you Alt-Double Click the placed file, you are returned automatically to the opened Illustrator file so that you may make adjustments. When you save and close Illustrator, the InDesign placement is automatically updated. The third spread of Dave Newman's article has been designed in this way with the vector art placed three times and set behind the pictures. The scroll and flourishes around the text are CorelDRAW originals placed via the clipboard.


SWPP - Society of Wedding and Portrait Photographers
The Society of Photographers
Clwyd Chambers, Clwyd Street, Rhyl, Denbighshire, LL18 3LA, UK
Tel 00 44 (0) 1745 356935
Home Page - Find a Photographer - Benefits of Membership - Events and Seminars - Who's who - Photographic Trade Directory - About - Qualification Structure - Mentor Me Programme - Professional Imagemaker Magazine Articles - FREE information pack - Privacy