


articles/Lighting/automationandnaps-page3
by Dave Montizambert Published 01/08/2009
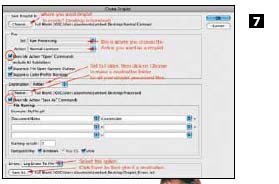
To create a Droplet select 'Automate' from the File menu, from the resulting pop-up menu select 'Create Droplet...'. In the 'Create Droplet' dialogue box (see Image 7), the first order of this 'I Want To Automate My Life' business is to identify where the Droplet should reside.
To find a nice convenient home for your Droplet, click on the 'Choose...' button under 'Save Droplet In' heading. In the dialogue box that suddenly appears, navigate to a convenient spot on your computer for the Droplet to hangout and then give the Droplet an appropriate name like 'Normal Process'. Under the 'Play' heading we need to identify which Action we wish the Droplet to access and we need to identify which Set of Actions that Action resides in. If you click and hold on the field next to 'Set:', a list of all of the sets of Actions you have will be displayed.
Select the appropriate Set, in my case the Set called RAW Processing. Below the Set field is the 'Action' field, click on this to select the right Action from the list of Actions residing in that set. If only one Action is displayed in this list, it means that all you have is one Action in that set. The 'Set:' and 'Action:' fields will display the last choices used, if you have just finished creating your RAW Processing Action, then the correct Set and Action will already be displayed. Under the 'Play' heading, click on 'Override Action Open Commands', this will override the Action's need to open the original file that we recorded opening when creating the Action. We don't want Photoshop to open this file anymore, we want it to open whatever RAW files we drag on to the Droplet icon.
Next to the 'Destination' heading I choose 'Folder' from the pop-out list. Just below this is the 'Choose' button, click on this and in the resulting pop-up menu create a folder for Photoshop to save your processed files to (I called mine 'Processed Tiffs'), and save to a location on your hard drive that is easy for you to access (I once again chose my desktop); this is where the final processed image files will end up. Back in the 'Create Droplet' dialogue box select 'Override Action Save As Commands', this will instruct Photoshop to save to the destination you just created in the last steps rather than to the destination recorded in the Action. Under 'File Naming' I leave this set to 'Document Name' and 'Extension'. And finally next to 'Errors:', select 'Log Errors To File' rather than 'Stop For Errors', this will tell Photoshop not to stop if it runs into a problem. 'Log Errors To File' is important, imagine if you will using the Droplet to process several hundred RAW files, if Photoshop ran into a problem on one of the files it would throw up a warning message while grinding to a halt. Photoshop would sit there like a loser, waiting for you to tell it what to do.
You would no doubt be somewhat upset upon returning from a nice refreshing nap to find this warning message rather than a folder full of processed images. Anyhow once you have the handling of errors properly set, click on the 'Save As' button under 'Error:' and choose where you want the Errors' log text file saved to (I save to the desktop so I can easily check it and throw it out after processing). The final step to finalise the making of this Droplet is to click on OK. In a second or two, the Droplet's icon should appear, ready for business, on your desktop or wherever you instructed it to appear. Now it's time for a test-drive, click and drag a RAW file, or better still a folder of RAW files onto this Droplet thumbnail and sit back while all hell breaks loose. Photoshop really loves showing off and running a series of processing moves at high speed with a Droplet/Action has to be one of its favourite tricks. Once the dust settles check out the destination folder to see the results - very exciting stuff!.
So with this little bit of automation you can streamline your imaging workflow and since you are saving a copy of the image and not overwriting the original RAW data, you can go back and reprocess any problematic RAW image file that may need custom processing due to exposure error or lighting error or for artistic reasons. This little bit of automation may seem a small thing, however don't underestimate its power, it may well save a marriage or two and will most certainly save your poor over-worked adrenal glands. At the very least the afternoon naps it will afford you may start to dissolve away those dark bags under our eyes, enhancing the image of photographers everywhere.
Experienced Photoshop users might wonder why I do not use Adobe Bridge and its Image Processor to process my images. There are p r o s and cons to this choice. The sidecar file in an 'adjusted' RAW file is not a pre-set and may be varied with each and every one of your files, should you so wish. You may also use 'Synchronization' in Bridge to bring selected groups of images to the same, consistent settings. However, apart from scaling, Image Processor can do little else. If you need to convert to CMYK, special sharpen, add key lines, watermarks or any other of the things that Photoshop can do with an action then an action / droplet it has to be


SWPP - Society of Wedding and Portrait Photographers
The Society of Photographers
Clwyd Chambers, Clwyd Street, Rhyl, Denbighshire, LL18 3LA, UK
Tel 00 44 (0) 1745 356935
Home Page - Find a Photographer - Benefits of Membership - Events and Seminars - Who's who - Photographic Trade Directory - About - Qualification Structure - Mentor Me Programme - Professional Imagemaker Magazine Articles - FREE information pack - Privacy