articles/Digital/captureraw-page1
Image Capture for RAW - part 1 of 1 2 3
by Mike McNamee Published

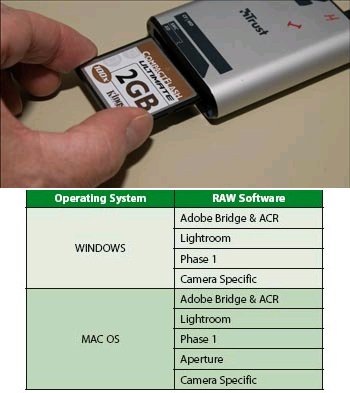
Faced with the need to process a RAW file into something more amenable to manipulation, the photographer is confronted with a number of options, all vying for the pound in their pocket. On the top line you have to decide what operating system you wish to use and, depending upon your camera marque, whether you wish to use the camera maker's software.
Having made an initial decision you have the universally popular Bridge, the upcoming Lightroom from Adobe and, for the Mac, Aperture joins the party.
All of the systems provide RAW opening, basic colour correction, and translation to a universal format (usually TIFF or JPEG). Adobe Camera RAW opens right up into Photoshop, but Bridge can be routed to various automatic scripts, hosted by Photoshop. Lightroom and Aperture provide the ability to create slide shows, web pages and print output. This is done without the need to use Photoshop.
Next we move on to the software provided by the camera makers themselves.
Why use the camera-maker software?
A pertinent question. The downside is that it only opens its 'own' files. If, like us at Professional Imagemaker, you use many cameras, they are little use as universal tools. However, the camera maker should know and understand their own chips, lenses and software and for certain operations they provide added functionality and greater precision. For example, the Fuji FinePix does a demonstratively better job of handling recovery of over-exposure from its own RAW files. Capture NX has some added functionality provided by Nik software engineers, called U Point, which is worthy of full discussion and this is included later.

In a nutshell, you are okay with camera-maker software for simple processing and colour correction, and occasional recovery of 'difficult' files. As soon as you need to do pixel manipulation (other than red eye, scratch and dust removal) you have to go to a full editing package such as Photoshop, Adobe Elements or Corel PhotoPaint. This is also true for selective colour correction, which requires the use of masks. Capture NX has functionality to correct specific parts of an image based on area, either with its sophisticated U-point Technology or with rudimentary masking.
In terms of speed of operation you really need to process a group of files with a stop-watch in your hand. If your workflow is such that you work slowly and carefully on a small number of files then this is not an over-arching consideration. For a wedding professional or sports photographer it suddenly gets to be important, making the difference between hitting or missing a deadline. For some, RAW file capture is out of the question (if, for example, files are transmitted very shortly after being exposed).
Nikon Capture NX
This is the main software for this review and even though it is Nikon-specific for RAW files some of the features, when applied to TIFF or JPEG files, make it attractive in its own right for other camera users
Speed
We undertook a comparison of the operating speed against Adobe Bridge. For the record, the test set-up was an AMD Athlon 64x2 3800+ running with 2GB RAM from a 250x2 RAID 0 array for the OS and a 250x4 RAID 0,1 array with the stored files. The timings show Capture NX followed, in brackets, by the same files processed in Bridge or Photoshop:
Time to launch software 18.6s (Photoshop 12.3s) Time to re-launch software 3.6s (Photoshop 6.5s) Time to open NEF D200 file 11.6s (5.1s & 2.1s) Time to open 10 files in ACR 6.0s + 4.6s to cache the sidecar files.
Time to open a group of 149 files already cached - 10.5s
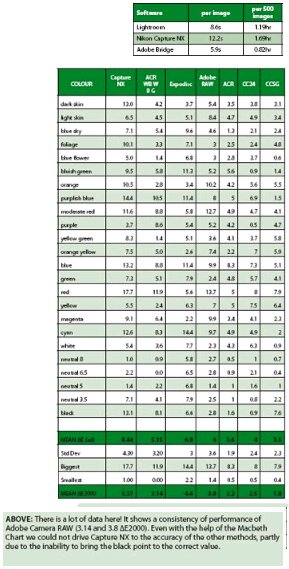
In searching for a comparative method of effective print speed we wished to use a number of files but not waste reams of paper. In addition we wanted to overcome the problem that Bridge does not print directly from the application. To do this we printed to a virtual printer using Acrobat Distiller Professional 7 and for Bridge we also made a pdf file of the same 10 images. The timing, per image, to process a Nikon D200 NEF file were as follows:
For a 500 image wedding-set of files this would represent a penalty of a little short of an hour to make a pdf if set up in this way.
Overall then Bridge comes out well in this analysis with Capture NX trailing.
Colour Precision
This is quite difficult to pin down but we took the same RAW image and set the white balance, white point, mid-grey point, and black points in ACR using the known values. We then measured all 24 swatches of the Macbeth Colour Checker and processed them via our colour audit process to compare the expected values with those in the file. We already have data on this test and so we have form for comparative purposes.
Try as we might we could not drive the NX results to the same level of precision as ACR and certainly not as good as profiling the target with Monaco Profiler Pro (see the table alongside).
We were trying to set the Macbeth grey swatches to 243 , 121 and 56 RGB points but could not drive the black up to 56 RGB; it stalled, too dark, at 38 points.
You are currently on page 1 Contact Mike McNamee
1st Published
last update 09/12/2022 14:52:15
More Digital Articles


