


articles/Digital/captureraw-page2
by Mike McNamee Published
RAW Capture and Viewing Options
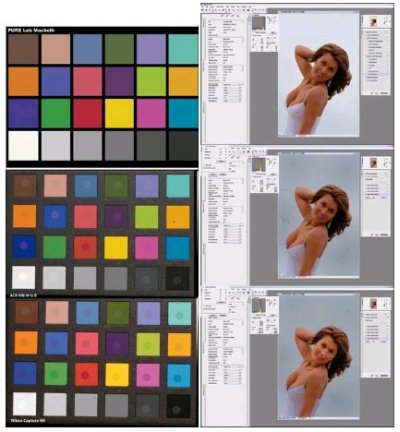
There are a variety of ways of presenting the results visually. One way is to place the resulting colours on top of the 'pure' reference colour with the latter as a superimposed spot. This is a very sensitive test as the eye discriminates clearly between errors. It suffers from a lack of information about just what is wrong with any given colour.
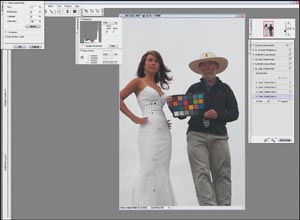
More important is what real images look like! This is always our maxim. We processed some real shots from a recent shoot. Overall we found the working of the control points to be a little jittery with the effects taking a few seconds to catch up, leaving us oscillating back and forth on some occasions. As with other methods setting the white point by clicking on a bride's dress simply blew the detail away, you have to take far more care than that! The increased amount of readily available meta data from the camera was a useful diagnostic when reviewing images. We set up the image for overall exposure, then placed control points to darken the sky and finally placed a control point over the model's face to selectively lighten her features. As a starting point it was a good benchmark and it was processed without going near Photoshop. The one thing we could never do with any of the shots from this shoot of Tom Lee's was neutralise the image by clicking on Jen's dress, there was too much brightening agent in the material which sent the white balance spiralling out of control! Comparing the values for the dress and the Macbeth White swatch, the dress was consistently 8 Lab points bluer. We overcame this by setting the neutral off theMacbeth Chart (leaving the dress too blue) and then using four colour control points in the dress each of which reduced the saturation in the dress, thus losing the colour. This was quicker than doing the same thing using masks in Photoshop.
"U-Point technology is the unique point about Capture NX and is strong enough to justify the purchase of the software"
U-Point technology
This is the unique point about Capture NX and is strong enough to justify the purchase of the software. It solves one of the most common problems - that of over-bright skies against a correctly exposed foreground. Normally this requires the use of a mask to control where the lightening takes place. A reasonable level of skill is required, particularly if the sky dodges behind a tree or other complex shape. UPoint has very clever selection and feathering which makes a really classy job, with the added advantage that the sky is being darkened using RAW data - the purest available and arguably better than processing the file to Photoshop and 'recovering' fixed pixel data.


SWPP - Society of Wedding and Portrait Photographers
The Society of Photographers
Clwyd Chambers, Clwyd Street, Rhyl, Denbighshire, LL18 3LA, UK
Tel 00 44 (0) 1745 356935
Home Page - Find a Photographer - Benefits of Membership - Events and Seminars - Who's who - Photographic Trade Directory - About - Qualification Structure - Mentor Me Programme - Professional Imagemaker Magazine Articles - FREE information pack - Privacy