articles/Lighting/endgamesecond-page2
The End Game - the second half - part 2 of 1 2 3 4
by Dave Montizambert Published 01/02/2006

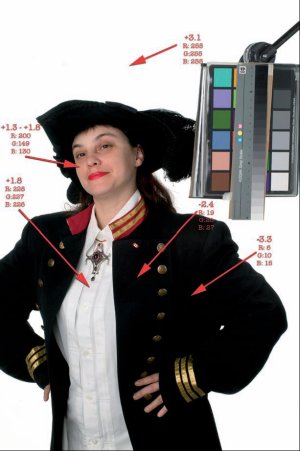
By looking at the numbers it is easy enough to learn if you within the safe zone for pleasing flesh-tone densities, and for shadow and highlight detail, but what do these values actually look like? That is an artistic decision, a visual decision. In my early days of shooting, long before digital, I used to swagger around bragging to fellow photographers that I never needed to shoot Polaroid test prints to get my exposure and contrast range right - I could do it all with meter readings prior to exposure. I was correct, however once I started shooting Polaroids my images became much more powerful because I could better see the meaning of the meter reading values and alter my lighting so I could better manipulate those values for more impact. There is nothing like having a hard cold 2 dimensional preview on paper in your hand to better judge your art rather than an impression floating around your head that you are trying to attach numbers to. And once you have seen a few prints displaying metered values or densitometer values from the Info Palette, you soon develop a feel or a memory for what values will look like printed. For this I have devised a simple test that will help you to pre-visualize what those numbers will look like printed.
To start the test, set up something that is typical of what you shoot. For a wedding or portrait photographer, include a standard flesh-tone (someone's face), a neutral white such as a white shirt, and a neutral dark tone such as black wool jacket - see my test image, [3]. Also pop in a greyscale like the Macbeth 24 swatch colour chart or the Kodak Separation Guide, if you have it. This test can be done anywhere: outside in available light, in studio with strobe/flash lighting, or in your front room with window light. Warn your model that they will have to hold the pose dead still for 5 minutes. Quickly draw a sketch on paper of what you see in the camera frame, and then using a spot meter (a reflective meter not incident and if you don't own such a device then rent or borrow one) take readings off the subject's face, shirt, jacket, in fully lit areas and in shadow. If you have a greyscale in the shot, meter its swatches too. Now label the sketch with the metering values you just took. You could even place sticky notes with the values written on them and with arrows pointing to the metered spot onto the subject. Take an exposure. If you applied sticky notes, remove them and shoot again so that you have an unobstructed image too. Is your model still holding still?

Metering Values
I always use metering values rather than f-stop shutterspeed combinations. F-stops and shutter-speeds are image specific whereas values are not. To calculate a metering value, simply compare the reflective reading with the camera setting. The camera setting always represents middle grey. If my camera was set to f11 (so f11 equals mid-grey) as in the test image of Sylvianne (see image [1]), and if a reflective meter reading off her jacket reads f5.6, then that value is a minus 2 or a Zone 3 - f5.6 reflective reading relative to an f11 aperture opening will render a tone two stops darker than middle grey. I prefer the plus/minus system to the Zone system. In the Plus/Minus system, Zero equals middle grey (Zone 5), Minus 2 equals two stops below middle grey, and Plus 1 equals one stop brighter than middle grey (Zone 6).
Please Note:
There is more than one page for this Article.
You are currently on page 2
- The End Game - the second half page 1
- The End Game - the second half page 2
- The End Game - the second half page 3
- The End Game - the second half page 4
1st Published 01/02/2006
last update 09/12/2022 14:53:48
More Lighting Articles
There are 0 days to get ready for The Society of Photographers Convention and Trade Show at The Novotel London West, Hammersmith ...
which starts on Wednesday 14th January 2026


