


articles/Postproduction/fairbairn-part2-page2
by George Fairbairn Published 02/02/2015
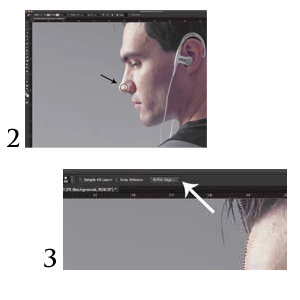
Set your brush to a size that is smaller than the area you want to select, but to something that is manageable. Too small and it will take you longer to make your selection, too big and you will start selecting areas outside of what you want (see image 2). This is roughly the size to subject area ratio that I tend to use most often. It is important that your brush is small enough to get into all the different curves and creases that your subject will have.
If your selection runs outside of your subject (which will happen) don't worry! To eliminate an area from your selection simply hold down the 'ALT' key and now when you 'paint' you are removing areas from your selection. Again, the Quick Selection tool is pretty good at finding these edges but it doesn't always get it right first time and will need little corrections throughout your selection process.
Once you have your selection made (don't get overly fussed over hair just yet) you will want to use an awesome part of the Quick Selection tool called Refine Edge. The button for this is located in the top menu when you have any selection tool active (see image 3).
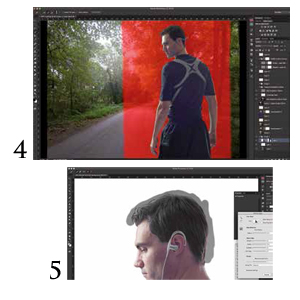
Once the Refine Edge screen comes up, you will notice two things. One is just how BAD the selection looks! It will be really rough and not at all smooth (we will come to this in a minute) and the other thing you will notice is that you have a brush! This is important, for MOST hair this tool is a life saver. Simply paint around the hair areas, keeping the crosshairs of your brush on the edge of the hair (see image 4). Once Photoshop calculates this area, you will see something rather magical with the hair selection. This method doesn't always work on hair, for example if there are a lot of stray hairs, or if there is a big light glare on the hair it will struggle as well. These will call for more complex cut-out solutions that we will cover in another article.
Now, about the roughness of that selection. This is very easy to fix in the Refine Edge window. There is a slider called 'smooth'. Simply move this slider to the right until the image looks good. Usually this is a very small amount. That's it...select your output at the bottom of the menu. I usually select 'Layer Mask'.
Once the cut out is output it's simply a matter of dropping it into your background! This can be done by either selecting the entire image, copying it and then pasting it onto your background, or by using the 'move' tool and dragging it to the window with your background image.
Once there, we need to move onto the next steps.
Tying the Images Together
If you read Part 1, you should be putting a portraitorientated image onto a landscape-orientated image. When you do this, it is very important that you take care of the edges. If you look at image 5, you will see I enabled quick mask so that you can see the edges of the mask. The mask doesn't cover the whole image. If we were to leave it alone, there would be a very sharp line around the edges of the mask. To fix it you simply need to paint with a soft brush, with black, on your layer mask around the edges to make the sharp line a soft one. That's it, but extremely important because if you don't you will finish your image and see a strange white line running through your image.
Once you have your image positioned in the place you would like it, we need to start making it all look good. And this is extremely easy! There are two keys here. The first is to make sure that all editing takes place on the 'finished' image. What I mean is that you make all your contrast, sharpening, etc. on the combined images, not them separately. This applies all your adjustments to the image as a whole and goes a long way to tying it all together. The second important aspect is colour. When you first put your subject into your background you are going to notice that the colouring is way off. This is because your subject is shot in a studio and your background is not. Weneed to make the colours and tones match and this is easy to do.


SWPP - Society of Wedding and Portrait Photographers
The Society of Photographers
Clwyd Chambers, Clwyd Street, Rhyl, Denbighshire, LL18 3LA, UK
Tel 00 44 (0) 1745 356935
Home Page - Find a Photographer - Benefits of Membership - Events and Seminars - Who's who - Photographic Trade Directory - About - Qualification Structure - Mentor Me Programme - Professional Imagemaker Magazine Articles - FREE information pack - Privacy