


articles/Postproduction/fairbairn-part2-page3
by George Fairbairn Published 02/02/2015
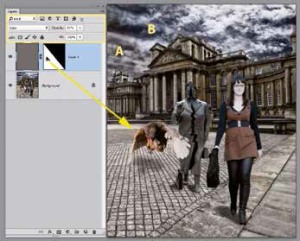
One of the things that characterises George's images is the light touch he applies in desaturating the images by the method described in the text opposite. It is so good it is worth expanding as I have often wondered just how he got the effect. In this screen grab the Average layer is the top one and note the blending mode at 'colour'. The opacity has been boosted too so that the reader can easily see the effect and the masks highlight difference between zone A (Color 'Averaged') and zone B (original). The same is highlighted by the mask across the chicken. The overall effect is to smooth differences in colour and reduce the overall saturation.
The simplest way to do this is with a filter called 'Average'. To try it out you first need to create something called a 'stamp layer'. This can only be done via keyboard shortcuts. On a Mac it is Shift+Alt+Cmd+E all at the same time. On a PC it is Shift+Alt+Control+E. What this does is make a new layer that is a combination of all the layers below. Once this stamp layer is created simply go to Filter->Blur->Average. You will notice your image has suddenly become a solid colour! What this is doing is making a colour layer that is the 'average' colour in the image. Pretty neat! Now we need to change the blend mode of the layer to 'Colour' and reduce the opacity to around 20%. This is my preferred method for correcting colour as it only affects colour, and doesn't affect the contrast or anything else. This is the first step I do after I have combined the images and added shadows (if necessary). I then do this a couple more times throughout the editing process as the colours and tones will change as you edit.
Another method for affecting the colouring throughout the image is with Gradient Maps. This is a tool that is located in your adjustments palette and is extremely powerful. The basic premise is that you can select what colour you want in your shadows and what colour you want in your highlights. You can even dig deeper if you want and select colours for your mid-range as well. Generally speaking, in nature you see blues in the shadows and yellows in the highlights. This is a good place to start when using Gradient Maps. Once you have created your Map, you need to set the blending mode and opacity. This is where Gradient Maps can make massive changes to your image. Setting the blending mode to 'Colour' here doesn't give you the desired results. Even though we are only affecting the colour, it takes away a bit of contrast and generally brightens the image. The two blending modes that are ideal for a Gradient Map are Overlay and Softlight. Both of these blending modes will also affect your contrast. Think of Softlight as a 'light' version of Overlay. If Overlay is too extreme (even at low opacities) try Softlight. Make sure you reduce the opacity to suit. I usually have mine set to anywhere between 10-30%, but this will vary greatly depending on each image and its requirements.
That's it really! There are some more complicated processes within here that I will dedicate future articles to. But, as you can see, the editing part of creating a composite is not that hard. It's a matter of knowing what tools to use, and what some of the pitfalls are. The most important part is the planning and shooting of the image itself.
I would love to see any composites that you have created! Feel free to send me an email if you have any questions. Alternatively I hold many training workshops and mentoring sessions throughout the year so get in touch if you're ready to take the composite plunge!


SWPP - Society of Wedding and Portrait Photographers
The Society of Photographers
Clwyd Chambers, Clwyd Street, Rhyl, Denbighshire, LL18 3LA, UK
Tel 00 44 (0) 1745 356935
Home Page - Find a Photographer - Benefits of Membership - Events and Seminars - Who's who - Photographic Trade Directory - About - Qualification Structure - Mentor Me Programme - Professional Imagemaker Magazine Articles - FREE information pack - Privacy