


articles/Portraiture/gatsbyatmidnight-page2
by Alisatair Campbell Published 01/07/2016
The Making of Gatsby Backdrops
A little after the current fashion of tagging a 'how it was done' at the end of a natural history documentary, we include here some notes on how the backdrops for Alistair Campbell's feature were created.
The first port of call was to research F. Scott Fitzgerald's novel, The Great Gatsby. The book is loosely based on the author's life, dealing with a yearning for romantic love from a distant and demanding beauty, wealth and a lavish, decadent lifestyle based in an era when alcohol was prohibited. The Great Gatsby is regarded as one of the most important literary chronicles of the Roaring Twenties. It was a time of flappers, jazz, alcohol bootlegging and is renowned for its wild parties.
Thus the décor for both the book and the 2013 film is firmly entrenched in the period. The Art Deco period lasted through the 1920s and 1930s before waning after World War II. To quote from a web reference: "Deco emphasizes geometric forms: spheres, polygons, rectangles, trapezoids, zigzags, chevrons, and sunburst motifs. Elements are often arranged in symmetrical patterns. Modern materials, such as aluminum, stainless steel, Bakelite, chrome, and plastics, are frequently used. Stained glass, inlays, and lacquer are also common. Colours tend to be vivid and high contrast."
It is also characterised by orthogonal lines and juxtapositions of thick lines alongside thin lines. This is particularly amenable to the use of both Adobe Illustrator and Photoshop as using the shift key automatically constrains the mouse to move horizontally, vertically or at 45°.
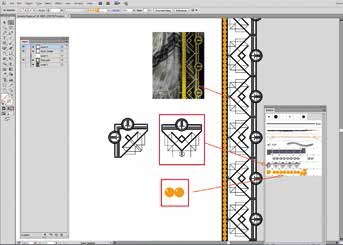
The 2013 film, based on the book, provides excellent reference visual material (they have after all done all the legwork!). The natural starting point for our Art Deco screen work is Illustrator. Complex line shapes may be set out, duplicated and reflected both vertically and horizontally with a few clicks of a mouse. Converting a simple shape into a Pattern Brush enables the user to create complex-looking frames by simply running the brush stroke around a vector rectangle, the work of seconds.
The basic workflow consists of building the repeating frame pattern as a single tile and then converting it to a Pattern Brush. This process also deals with the spacing into unequal frame edges and turning both inside and outside corners.


SWPP - Society of Wedding and Portrait Photographers
The Society of Photographers
Clwyd Chambers, Clwyd Street, Rhyl, Denbighshire, LL18 3LA, UK
Tel 00 44 (0) 1745 356935
Home Page - Find a Photographer - Benefits of Membership - Events and Seminars - Who's who - Photographic Trade Directory - About - Qualification Structure - Mentor Me Programme - Professional Imagemaker Magazine Articles - FREE information pack - Privacy