articles/Cameras/kodakdcs-page3
KODAK DCSPro14n Big Chips for High Rollers - part 3 of 1 2 3 4 5
by Mike McNamee Published 01/04/2005

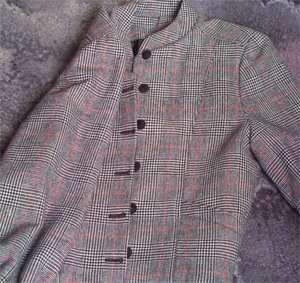
Tweed is always a demanding test for a digital camera. No evidence was seen of Moire Fringing in the original file although it might appear after repro! The Nikon F mount allows much of the legacy macro gear to be used. This original at 1x magnification.
Lens Calibration
One of the reasons for the extended camera start up time is that a Look Up Table(LUT) has to be loaded after the camera has detected the type of lens attached to it. This is an interesting feature, which is not mentioned in the literature that comes with the camera and has not been mentioned in any reviews seen by this author. In essence the camera detects the lens type, and the rear focal distance to be accommodated, from the lens CPU. Use of the wrong value creates a gradient of colour casts from magenta in the right of the image though to green in the left of the image. With incorrect settings, the effect is quite pronounced. In our desire to really test the resolution of the chip we used an older 105mm Micro Nikkor of known, superlative optical quality. This was a very poor match when using the Auto Calibration setting. Eventually we had to test all four calibration setting to find the optimum (Type 1 for the record) before we got a decent image. In normal use with a new camera and new lens this would not be a problem although we did note significant vignetting on the modern 24.85mm F3.5-4.5G Nikkor (which, incidentally, Nikon do not recommend for professional use).

On test
Some of our early testing was compromised by the use of the wrong lens calibration setting. Blissfully unaware of the problem at that time we shot everything on Auto for the Lens Calibration, not really paying attention to which lens we were using. We tried the camera out on various close-up attachments and Micro Nikkors as well as telephoto lenses.
We shot across the Mersey to the Liver Building using a 105mm Micro Nikkor, a 50mm F2 Nikkor and a 24mm F2 Nikkor. The wrong setting of the lens calibration invalidated the tests but we did try out 80 ISO and 400 ISO speeds and have placed the images side by side. The DCS 14n does produce a rather ugly structure to its pixel patterning when viewed very close, but this will not trouble the viewer at normal distances and will be invisible in a print - you do have to guard against looking too close in Photoshop. The 400 ISO noise is, however, much higher than that at 80 ISO.
The size of the full resolution file is a bit of a shock at first. At almost 40MB you only get 15 on a CD, but that is the price of all that resolution! Given that you treat a RAW file like a negative and make variants in PhotoDesk, the storage builds very quickly. In the studio, downloading images from the Compact Flash card took proportionally longer as well. If you choose to continually review your images mid-shoot, two cards will be a boon as this enables you to continue shooting while the down-load is completing. We were certainly glad we did mid-shoot checks as we forget to change the lens calibration setting at one stage and were left with 15 heavily casted images which had to be repeated. While this was a mistake on our part the warning is obvious - if you choose to operate the DCS 14n with non-CPU Nikkors you have to be extra diligent in checking your settings.
Please Note:
There is more than one page for this Article.
You are currently on page 3
- KODAK DCSPro14n Big Chips for High
Rollers page 1
- KODAK DCSPro14n Big Chips for High
Rollers page 2
- KODAK DCSPro14n Big Chips for High
Rollers page 3
- KODAK DCSPro14n Big Chips for High
Rollers page 4
- KODAK DCSPro14n Big Chips for High
Rollers page 5
1st Published 01/04/2005
last update 09/12/2022 14:55:34
More Cameras Articles
There are 0 days to get ready for The Society of Photographers Convention and Trade Show at The Novotel London West, Hammersmith ...
which starts on Wednesday 14th January 2026


