


articles/Lighting/lightingfordigital2-page2
by Dave Montizambert Published 01/06/2007
Now what if we tore a piece from the mid-grey seamless backdrop and placed it over the white seamless, then took a reflective reading off the mid-grey paper fragment being careful to read only the grey paper and not the white, set our cameras to this setting (f5.6 at 1/60th at 100ISO), removed the grey paper and then took another picture - what do you think the white seamless would look like? What if we did the same procedure only instead of photographing the white seamless backdrop we photograph the black seamless backdrop at f5.6 at 1/60th at 100ISO - what do you think the black seamless would look like? Well the white paper would look white and the black paper would look black, in other words they will be correctly exposed.
By metering off the mid-grey paper fragment or, better still a middle grey card, the meter gives us a camera setting that will make middle grey appear as middle grey in our image. If we make middle grey look middle grey, then white will photograph as white and black will photograph as black. In fact all other fully-lit tones, if present, will fall into place accordingly. If there is not a mid-grey tonality to take a meter reading from, we can temporarily add one to meter off, then remove it before shooting. Or if you are very good at recognising tones - knowing where they should fall on the grey scale - you can take a reflective meter reading off them directly and then alter your camera exposure setting by the correct amount from what the meter reads, to place that tone correctly in your image, relative to middle grey. For example, the white seamless paper should be white with detail, which is two stops brighter than middle grey. If we had taken the f11 reflective reading and opened up two stops from what it read, we would have set our cameras to f5.6, the same setting as the reading we got from the mid-grey paper. However, recognising tones is difficult, especially when they are colours. That's why reading off a fully-lit mid-grey tone like a middle grey card, that you can put in your shot to meter off then remove prior to shooting, is an easier and more consistent way to get correct exposures. But what is a correct exposure?
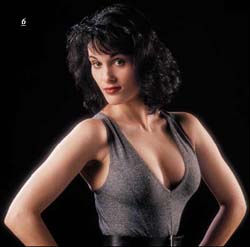
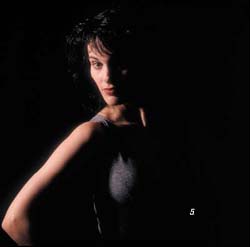
A correct exposure is when a fully lit area of a subject's true tonality is placed at its correct value in the image so that this tonal brightness appears the same as it does in reality. For instance the true value of my skin is one stop brighter than middle grey (depending on the time of year) and for a proper exposure it should be placed at that value in the image. Keeping that in mind, look at images 5 & 6, and pick out which one is the correct exposure. If you picked 5 you are correct and if you picked 6 you are correct; they are both correct exposures! Image 5 is a little tricky, it has very dark shadows, which in gear-head speak would be referred to as high shadow contrast, however, the lit side of Gillian is represented correctly in the image therefore this is a correctly exposed picture. If you thought that Image 5 was an incorrect exposure you were mixing up exposure with lighting. Even though you may not like the lighting in this picture (lighting position and shadow contrast) you have to agree that it is correctly exposed.
Technically speaking you can never say that lighting is correct or incorrect, lighting is an opinion whereas exposure is a hard, cold fact; lighting is subjective, exposure is objective, and when sizing up a problem image such as image 5, it is important to differentiate which is the issue.
Sometimes the objective can be considered subjective when you decide to under- or over-expose a subject for a certain mood or effect, such as the over-exposed flesh tones that are often popular in fashion and glamour. In Image 1 model Michelle Snow's flesh is grossly over-exposed, by around 1½ stops. Is this a correct exposure? No. Is it a good exposure? I think so and so did the client. So we could say that this incorrect exposure is a good exposure since this exposure better portrays the feel we were after. In a nutshell, correct or incorrect exposures are objective and good or bad exposures are subjective.
The subjective part of photography is lighting, it is the creative part; you can make a shadow any density darker than the true tonality you want and you can make a specular highlight any density you want brighter than the true tonality it sits upon. You can also make the edges of shadows and specular highlights as soft or as sharp as you want. The creative part of lighting is ranging and manipulating these areas to create the lighting to interpret the subject's shape and form in a way you want as well as placing the whole contrast range of your photo-set, relative to middle grey. So to answer the question, who do you expose for - Tony or Gillian? The answer is neither, you expose for middle grey and they will fall into place relative to middle grey. But exactly what is middle grey and how does it function within digital? Well that, and how to expose for middle grey, plus how the Zone System works but falls short for digital, will have to be left for next time.


SWPP - Society of Wedding and Portrait Photographers
The Society of Photographers
Clwyd Chambers, Clwyd Street, Rhyl, Denbighshire, LL18 3LA, UK
Tel 00 44 (0) 1745 356935
Home Page - Find a Photographer - Benefits of Membership - Events and Seminars - Who's who - Photographic Trade Directory - About - Qualification Structure - Mentor Me Programme - Professional Imagemaker Magazine Articles - FREE information pack - Privacy