articles/Lightroom/lightroomworkflownuggets-page1

Lightroom Workflow Nuggets - part 1 of 1 2

by Kevin Kubota Published 01/11/2007

lightroomworkflownuggets01.jpg

Seeing the Light. Why Lightroom?

Adobe Lightroom is easily the best workflow tool we photographers have at our disposal. One of the many features that sets Lightroom apart from the competition is the ability to save reusable presets for any combination of settings and adjustments. Presets can be applied to other images quickly, and exported and shared with other users. If you're familiar with Photoshop actions, then you know what a valuable time saver they can be. Presets are like mini-actions. You can't do everything you can do with an Action, but Presets are ultra handy tools.

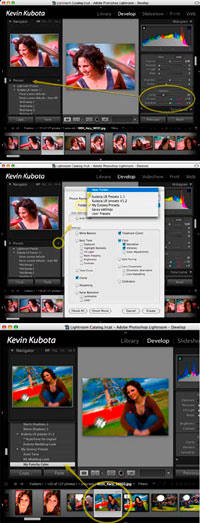
To create a preset in Lightroom, switch to Develop mode:

  1. Adjust the image using any combination of settings from the adjustment panels on the right.
  2. On the Presets panel at left, click the + button to create a preset. You can select a folder first to keep them organised, or create a new folder on the fly as you save the preset.
  3. Be sure to check off only the settings that you used to create the look, this way you can combine the preset with other adjustment presets that don't use the same settings. Otherwise, applying a new preset that contains the same adjustments will over-write the previously applied settings.
  4. Apply the preset to another image by selecting the image and clicking on the preset. Another cool feature is that you can preview what a preset will look like on an image by simply passing your mouse over the preset name. The result shows in the Navigator window. If you like the result, simply click the preset name to apply it to the image.


lightroomworkflownuggets02.jpg

Presets Power Tips

Now that you know how to make a preset, how can you really put them to good use?

Create an import 'My Look' Preset

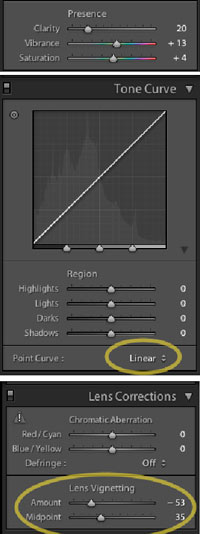
It 's a great idea to fine tune settings to get a 'look' that you like, then apply this automatically when you import images. This saves time and gives you a great starting point before doing any fine tuning. Here are settings we use for a basic look; feel free to modify to your needs. We apply this to all impor ted images by default:

  1. Add some Clarity, Vibrance, and Saturation.
  2. Set the Tone Curve to Linear. This gives a predictable starting point for future presets that might use a curve adjustment.
  3. We love the look of vignetting on all our images. If you like it too, apply it here. Remember, you can easily remove or adjust it later:
  4. When done modifying the settings, save the preset as 'My Look', and click Check All to include all the settings. This will ensure a consistent starting point. We also prefer to use Auto Tone as a star ting point as it automatically sets the appropriate Exposure, Recovery, Fill Light, Black point, Brightness, and Contrast for each image individually.
  5. Use your 'Look' preset when you import images.


You are currently on page 1 Contact Kevin Kubota

1st Published 01/11/2007
last update 09/12/2022 14:56:00

More Lightroom Articles


The Society of Photographers Convention and Trade Show at The Novotel London West, Hammersmith ...
You have 0 days until The Society of Photographers Convention starting on Thursday 1st January 1970

Nov 07305Professional Image Maker

Fast and intuitive, PortraitPro intelligently enhances every aspect of a portrait for beautiful results.

Update cookies preferences