


articles/Review/lightscribe-page1
by Tom Lee Published 01/04/2008
Lightscribe has been around for a number of years now, but for those that don't know, it's a means of placing images and text onto a specially coated CD or DVD, using the laser already incorporated in your CD/DVD burner.
Unfortunately not all CD/DVD burners are 'Lightscribe-enabled'. You can check for the logo that will be usually printed or etched into the disc draw to see if it's compatible. If you don't happen to have one, you can always buy an external drive, as I did, for around £25. This can now be used in either my main computer or laptop.
So why use Lightscribe? Well sticky labels have never been a good idea as they can unbalance a disc, making them unreadable, especially if they start to peel or haven't been centred properly. Printable CD/DVD's are about the same cost as Lightscribe discs and have the advantage of being able to be printed in colour, but they rely on using a special carriage fixed into your printer and the inks aren't cheap.
Printing directly onto the disc surface, the job immediately steps up a notch in quality, there are no inks to run out of and the cost is limited to the cost of the discs. Although the image and text are burned monochromatically onto the disc surface, the discs come in several shades, ranging from red, green, silver, gold, etc
Even if you are already a Lightscribe user, the software available from www.lightscribe.com has been updated and is much more user-friendly than previous versions. Best of all they're free downloads. Simply download the 'Essential User' software (needed to operate your Lightscribe system), the 'Template Labler' and the 'Quickstart Video' (which will run in Windows Media Player). Install all three items and then watch the video that runs for about 5½ minutes. The workflow is almost intuitive but 'newbies' will benefit from watching it.
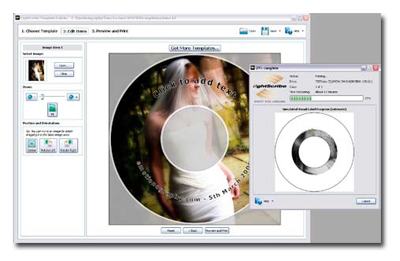
I simply launched the Template program using the desktop shortcut, and started designing. Lightscribe offer free template packages that can be loaded straight into the Template program, but I decided to use a blank disc template and loaded an image directly by double clicking the background and navigating to a suitable image. Double click on the file you want to use and it installs directly onto the template. Add a little text and the job was done in less than a minute.
The preview and print dialogue can be seen below. A pseudo representation of the disc burning process and progress bar also appears to show you where you are up to.
If there is a downside to this system, it's the time taken to burn a full image onto the disc - approximately 20 minutes! The simpler the template, the shorter time that the disc takes to burn.
Given that I only want to give my clients a taste of the best and that only one or two discs get printed, the time taken to burn the image is of little consequence. I don't sit and watch it, I do something else - like make a cup of tea! Altogether I think that the finished result is worth the effort and provides the client with a superior product.


SWPP - Society of Wedding and Portrait Photographers
The Society of Photographers
Clwyd Chambers, Clwyd Street, Rhyl, Denbighshire, LL18 3LA, UK
Tel 00 44 (0) 1745 356935
Home Page - Find a Photographer - Benefits of Membership - Events and Seminars - Who's who - Photographic Trade Directory - About - Qualification Structure - Mentor Me Programme - Professional Imagemaker Magazine Articles - FREE information pack - Privacy