


articles/Lighting/lightwahtlight-page3
Published 01/04/2007

While we have the soft box in position for illustrations E and F, I have the subject turn to present a profile to the camera and 'Illustration G' is with both diffusers and 'Illustration H' is with a single diffuser. This placement of the light is ideal for profile lighting and not, as so often seen, with the light directly in front to the subject, which unless the box is what we describe as a strip bank, where the light is narrow, perhaps just 12", the light over-illuminates the camera side of the face. Diagram [D].
The illustrations so far have demonstrated basic main or key lighting. Now let us consider the use of what is commonly referred to as fill light. The purpose of the fill light is to reduce the ratio between highlight and shadow. There is much discussion about ratios and too often instructors will discuss how we ascertain a ratio by describing the difference between the f-stop of the main light and that of the fill. I prefer to teach the skill of fill light by using our eyes. What we see is what we get and, as discussed earlier, we each have different senses and appreciations for the degree of contrast we prefer, so I will dispense with describing how we come to a 3:1 or 3half:1 ratio because the only time we need to know the formula is when it is dictated by a client or instructor
I have a somewhat uncommon method of creating fill in my portraits. In the camera room I bounce a Westcott Halo-Mono (a double-sided umbrella, one side black and one side a diffuser-see illustration) light off a wall and the degree of fill is determined by the angle of the light directed at the wall, with option of rotating it so that the edge of the modifier can be directed slightly at the subject, which is most helpful when photographing large groups. But for this illustration we will use a silver reflector and position it at different distances from the subject. 'Diagram [E]' In 'Illustration J', the subject is again brought to a three-quarter view of her face and the soft box is again brought to a 45-degree from both subject and camera. In this example the reflector is positioned at 45 degrees off the subject, but on the opposite side of the subject, and camera, to that of the main light. In this example I have the reflector 36" from the subject. In 'Illustration K' the reflector is placed at right angles from the subject and with its edge slightly behind her and raised above her head to also light the back of her hair and to create separation from the background. 'Diagram [F]'
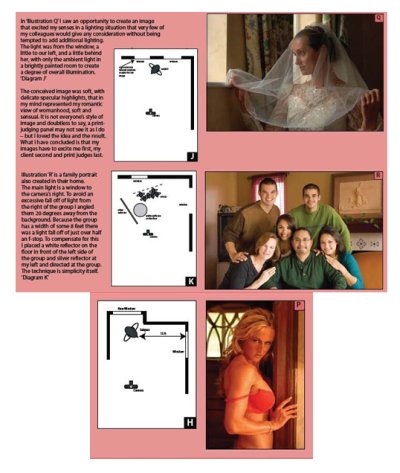
When I have demonstrated this technique at workshops and seminars, most of those present are more than surprised at the simplicity of a twolight and reflector set and the results we achieve. We create significant problems with the concept of pre-set lighting sets that use four or more lights in set positions. Illustration 'N' incorporates the main light, hair light and the reflector as described in previous illustrations. Illustration 'O' uses the same main light, hair light and reflector as in Illustration 'N' except that we have used a second reflector position as indicated in Diagram 'F', in which we have brought the reflector nearer to camera and slightly angled it to open up the shadow side of the face for a softer impression.
The foregoing illustrations do not preclude the use of additional lights when appropriate or desirable. But if we recognise light in natural situations they teach us that less is often better than more. In 'Illustration P', an image of a young woman positioned in a doorway and 15' away from a window at the camera's right and without the use of a reflector or additional lighting we have an image in which she is beautifully sculptured, simply because she has been angled correctly to the light. It is seeing the light that makes this possible. 'Diagram [H]'
Here is a challenge for my colleagues. Look into the shadows and you will see some wonderful images just waiting to be created. The image of a bride reposing below a window (see opening spread) represented to me the very essence of beauty and it excited my senses for the delicate, beautiful imagery that represents my signature style. So far, judging panels have been unable to appreciate this type of image, but given time maybe one day they will see what I see. Light.
Perhaps this article will help you to see light totally differently. Personally, I am creating images in my mind wherever I am as I see many different lighting situations in the mall, restaurant and in the street. Light excites me and it should excite you too, for without light in all its guises there is not photography. Use it wherever you see it and don't be afraid to break the rules once you have learned them. You will create more exciting images and set yourself apart from your colleagues.


SWPP - Society of Wedding and Portrait Photographers
The Society of Photographers
Clwyd Chambers, Clwyd Street, Rhyl, Denbighshire, LL18 3LA, UK
Tel 00 44 (0) 1745 356935
Home Page - Find a Photographer - Benefits of Membership - Events and Seminars - Who's who - Photographic Trade Directory - About - Qualification Structure - Mentor Me Programme - Professional Imagemaker Magazine Articles - FREE information pack - Privacy