


articles/Portraiture/lowkeyportraiture-page3
Published 01/06/2004

Incident Angle of the Light Source
The amount of light reflected back from a face (i.e. how bright it is to be rendered in the image) also depends upon the angle it presents to the light and the camera. As the light moves round from the subject's cheeks towards their ears, the light fall off gets to be quite rapid, a full stop over 10° between 45° and 60° and a full three stops between 45° and 80°.
On MetersTery Hansen
Hands up all those photographers who have dispensed with their hand held meters now that they are shooting digitally. As Chairman of Qualifications I am often seeing problems associated with poor metering. As we moved to digital photography it was often said that exposure was as critical as shooting transparency, it isn't, it's more critical. Many photographers seem to think that with auto metering on their camera all they have to do is point and squirt. Far from it, through the lens meters are easily fooled and you need to engage brain before pressing the shutter. Shooting against the light for instance often fools the camera; also, try photographing a groom and best man in morning suits against a dark doorway. You will soon realise your exposures are not very accurate. Another thing to bear in mind is that the majority of the cameras in popular use at this time Fuji S2 etc. are digital cameras built on cheap 35mm film camera bodies, costing around £400. This makes for an affordable camera, but means that metering, auto focus etc. are not as accurate or as positive as we would like. Another important reason for using hand-held meters is when working in the studio (or location) using studio or external flashes. You need to be able to meter both ambient light and flash light. Also when using multiple light set-ups you need to know the ratio of the lighting. Yes, you can establish correct overall exposure using the histogram on the camera, but the image on the screen is too poor to correctly assess the ratio of your lights. How contrasty will the images be? How dark are the shadows? If shooting a large group, is the lighting even across the picture? Questions that can only be answered by the use of external meters.
I have recently been testing three meters kindly supplied by Johnson Photopia. The Sekonic Flash Master L358 which despite its name measures ambient and flash exposure and costs £224.99 plus VAT. The Dualmaster L558 at £399.99 plus VAT which adds the ability to take spot readings. The ultimate meter supplied, the Super Zoom Master L608 costs £449.00 plus VAT. All three meters were incredibly accurate and consistent, if you are serious about your photography you really need to invest in a quality meter.
People who light subjects well by simply looking at the scene are skilled and subtle observers of light. Lesser mortals may care to set up using a hand held meter and a bit of experimentation (always carried out before your sitter arrives by the way!). The basic rules are as follows (although other may use different approaches).
1. Measure on light at a time with other turned off and proceed logically. Work out your light strength in stops.
2. Use an integrated light meter and point it at the light, from the subject position. If you have a very close main light remember that the thickness of the meter may be a significant proportion of the working distance. Some meters are quite flat, the Gossen Mastersix for example is about 6", a significant portion of a 15" working distance. Also make sure that you do not block any light out with your body as you stand into the scene.
3. Consider both the strength of the light and the tone of your backdrop. An under lit white backdrop can be made to look dark grey and conversely a massively lit black background can be quite light. Consider just what tone that you wish the backdrop to be reproduced and also any Vignetting you desire (see call out box on Vignetting).
4. Base your camera aperture on a reading taken with all light firing. Also consider how much shutter drag you are going to allow. The aperture controls the amount of flash reaching the film/detector, the shutter speed determine how much effect that the ambient light is going to have ( if any some prefer windowless studios!).
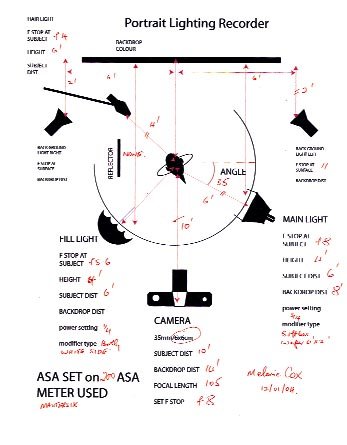
5. Once you have got it all together, make notes so that you can repeat what you have done - if it turns out much to your liking you will want to know. Old hands of course will know from experience! The diagram below is an example of hoe to record the information. Make up copies of a blank sheet and fill tem in as you go - it can be time consuming but will save time as you learn your lights.


SWPP - Society of Wedding and Portrait Photographers
The Society of Photographers
Clwyd Chambers, Clwyd Street, Rhyl, Denbighshire, LL18 3LA, UK
Tel 00 44 (0) 1745 356935
Home Page - Find a Photographer - Benefits of Membership - Events and Seminars - Who's who - Photographic Trade Directory - About - Qualification Structure - Mentor Me Programme - Professional Imagemaker Magazine Articles - FREE information pack - Privacy