


articles/Photoshop/magic-channel-page1
by George Fairbairn Published 01/08/2015
1
In part 1 we discussed using channels as masks for giving you ultimate control over the contrast in your images. Don't worry if you have forgotten some of the techniques we discussed in Part 1 as we are going to cover them all again, only using channels to control the colour and tone of our images.
One of the things I am most often asked about is achieving a 'cinematic' look in Photoshop. At the heart of it, the cinematic look is based on two things ...the colour of the shadows and the colour of the highlights. What these colours are really depends on you and your vision. However, if you watch a lot of films (especially action films) you will notice that they have a very blue and orange look to them. This is because most films use blue colouring in the shadows and orange colouring in the highlights. Why blue and orange? If you look around the world, you will see that this is the 'natural' look of the world. Shadows are generally cool and cold looking and areas of light are warm. Next time you are out for a walk, find an area where sun is shining and casting a shadow of something ...somewhere you can see the contrast. Now that you know what you are looking for, you will instantly see the cool/blue tones in the shadows and the warm/orange tones in the sunlit areas.
By default (and assuming your white balance is correct) your images are already going to have this effect. But it's not enough. It's there, but it isn't really noticeable and isn't adding any impact. We are going to make it noticeable and make the image look like it came straight out of an action film. How are we going to do this? Simple! We are going to add blue to the shadows and orange to the highlights!
2
You might be thinking that this is going to be a very painstaking task, but because of the channel layers in Photoshop, it's very easy. First, open up an image that you want to work on. The image I have chosen for this, I have already edited up to the point I would add the colour tones.
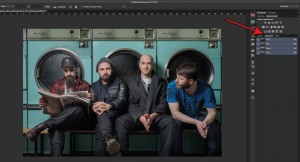
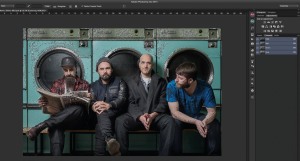
This means I have already added detail and adjusted my contrast (using channels of course!). I am now ready to adjust the tone of my images. Open the channels tab in Photoshop (image 1). Here you will see four options ...RGB, Red, Blue, and Green. RGB is the full colour version of your image and the other three are the different colours broken down. What you are looking for here, is which one of these channels offers you the most contrast; 90% of the time, this is the red channel, but it isn't always so make sure you check. When you have decided on a channel to use you need to hold down Command on a Mac or Control on a PC and click on the thumbnail of the channel you want to use. You will instantly see the 'marching ants' on your image (Image 2). This is Photoshop making a selection based upon the channel that you chose. Now click back on your layers tab (next to the channels tab). With your selection still going, create a new layer. You can do this by clicking the new layer button at the bottom of your layers menu or using shortcut Shift-Command-n (shift-control-n on a PC). Once the new layer is created you want to add a mask. Click the mask button (looks like a little camera at the bottom of your layer menu) or in your menu Layer>Layer Masks>Reveal Selection. This will add a layer mask to your image that looks a lot like the channel that you selected!


SWPP - Society of Wedding and Portrait Photographers
The Society of Photographers
Clwyd Chambers, Clwyd Street, Rhyl, Denbighshire, LL18 3LA, UK
Tel 00 44 (0) 1745 356935
Home Page - Find a Photographer - Benefits of Membership - Events and Seminars - Who's who - Photographic Trade Directory - About - Qualification Structure - Mentor Me Programme - Professional Imagemaker Magazine Articles - FREE information pack - Privacy