


articles/Photoshop/magic-channel-page3
by George Fairbairn Published 01/08/2015
5
Now we need to do the exact same process for the highlights. Make a selection based on the same channel you used before. Create a new layer and add a layer mask. Now select a nice orange/yellow to fill your new layer with (Image 6). Set your blending mode to color (Image 7). Again, it isn't going to look very good yet. We need to refine our mask again. This time though, we do not need to invert our mask as we are going to work on the highlights. Click on the layer mask, then hold down Alt and click it again to view the mask.
6
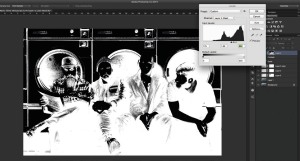
Hold down Command/Control and hit L to bring up your levels adjustment. Adjust your mask until you have white areas where you want orange and black areas where you do NOT want orange (Image 8). Once you are happy, click ok and reduce the opacity to taste. For me, once I am down with this it still looks a little strong. I put my two layers into a group (select both and hit Command/Control G) and then reduce the opacity of the group to 50%.


SWPP - Society of Wedding and Portrait Photographers
The Society of Photographers
Clwyd Chambers, Clwyd Street, Rhyl, Denbighshire, LL18 3LA, UK
Tel 00 44 (0) 1745 356935
Home Page - Find a Photographer - Benefits of Membership - Events and Seminars - Who's who - Photographic Trade Directory - About - Qualification Structure - Mentor Me Programme - Professional Imagemaker Magazine Articles - FREE information pack - Privacy