


articles/Photoshop/magic-of-channels-page3
by George Fairbairn Published 10/04/2015
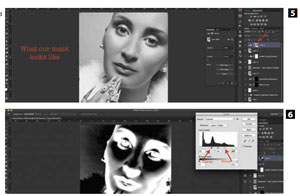
First we are going to darken the shadows. In order to do that, we need to adjust our newly created mask. If you hold down the Alt key and click the thumbnail of your mask, your image will change to show you exactly what that mask looks like (fig 5). Remember we said we want to darken the shadows first...now think about how a mask works. Light (or white) areas let the effects of the adjustment layer through, and darks (or blacks) stop adjustments from coming through. Looking at fig 5, we can see the lighter areas are white and that the darker areas are black. This is the OPPOSITE of what we want. With your mask selected this is as simple as inverting our mask. Hit Command (mac) or Control (PC) and I at the same time. This inverts our mask making the shadows white and the highlights black. This means any adjustments we make on this layer will only affect the shadows. For my editing, this mask is still too 'broad'. It's not targeted enough to the shadows area. Changing this is easy as well! Again with the layer mask selected, hold down Command (mac) or Control (PC) and hit L. This is going to bring up a levels adjustment, but a levels adjust for our MASK, not the layer. This will allow us to fine tune our mask and target the specific areas of the image that we want. Dragging the black slider in makes the black areas of the mask darker, and dragging the highlights sliders in will brighten up the light areas of the mask. Again, remember the white areas are the shadows of our image and the areas we want to adjust. I like this mask to be rather contrast adjusted to affect only the shadowy areas of my image (fig 6).

Once we have the mask controlling only the areas we want to affect, we simply click back on the levels thumbnail to view the image and not the mask. Now we can darken the black areas of the image by simply dragging the black slider of our levels adjustment inwards until the blacks look like we want them to (fig 7).
Now we do the same thing for the white. The exact same process, except we do not invert our layer mask.
To run through it again the process is as follows


SWPP - Society of Wedding and Portrait Photographers
The Society of Photographers
Clwyd Chambers, Clwyd Street, Rhyl, Denbighshire, LL18 3LA, UK
Tel 00 44 (0) 1745 356935
Home Page - Find a Photographer - Benefits of Membership - Events and Seminars - Who's who - Photographic Trade Directory - About - Qualification Structure - Mentor Me Programme - Professional Imagemaker Magazine Articles - FREE information pack - Privacy