


articles/Lighting/maskingyourretouching-page2
by Dave Montizambert Published 01/10/2011
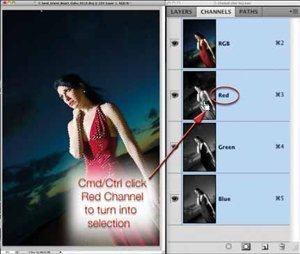
To soften the effects of the harsh lighting on Sherri, after using the Spot Healing Brush and the Healing Brush Tool to remove the big stuff (such as lines and wrinkles that flesh softening will not hide), a softened version (such as blurring a copy of the Healed version of the image with something like Gaussian Blur from the Filter > Blur menu) sits at the top of the layer stack. Now the whole image just looks blurry. From here most photographers paint away parts of the top, soft, layer with a layer mask wherever the sharp background layer needs to show through (ie, eyes, lips, teeth, nostrils, and all non-flesh areas). This last step is time consuming and could be greatly improved upon by engineering a luminance mask into the layer mask of the top soft layer. Where this mask is darker, all or some of the bottom, sharp layer shows through, and where the mask is lighter, all or some of the soft layer version is seen, ie the eyes, lips, teeth, nostrils, and all non-flesh areas appear sharp while the flesh of the face appears soft. The time-saver here is, as stated earlier, the masking for the layer mask already exists - you don't have to create it. Go to the Channels palette and Cmd/Ctrl (Mac/PC) click on the Red channel, this loads the luminance of the Red channel as a selection (see Image 004). Click on the Layer Mask icon at the bottom of the Layers palette (the grey rectangle with a white circle in the middle which sits between the 'fx' and the 'half black, half white circle' icons). You will suddenly see the eyes, lips, teeth, nostrils, and all non-red areas have become sharp again. If you look at the layer mask it will now look like the Red Channel from the Channels palette. Where this top layer layer-mask icon is white, the top soften layer is revealed, where the mask is black the underlying sharp layer shows through, and finally where the mask is a shade of grey it will only be partially softened in varying degrees.
Now the really cool part which I learned from Guy Gowan, is to constrain this layer to just the face, so that it cannot effect other red things such as Sherri's red dress, and to do it without much tedious painting on the layer mask, put this top layer into a Group - with the top softened layer active (highlighted), click on the "Create A New Group" icon at the bottom of the Layers' palette (the folder icon to the left of the Create New Layer icon). This places the softened layer inside of the layer Group. By putting this layer into a layer Group you can now effect the layer with a second layer mask. Click on the Layer Mask icon at the bottom of the Layers' palette while holding down the Opt/Alt (Mac/PC) key. This creates a black Hide-All layer mask on the Group layer which completely hides the effect of the softened layer.
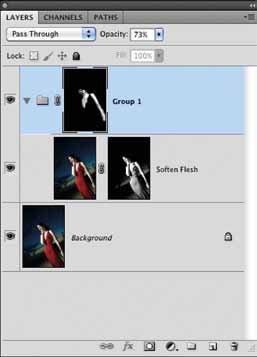
Select the Paint Brush tool by typing the letter B and then type X to switch the Foreground Colour to white. Drag the Paint Brush cursor over just the face - the white paint is applied to the layer mask of the Group and not the actual facial pixels. The white paint begins to reveal the softening layer with each brush stroke, obviously just paint over any exposed flesh parts (ie not the red dress). These paint strokes can be done with large, fast, sloppy brush strokes at 100% brush opacity and flow since the intricate brush work was done for us by the mask created from the Red channel. It is a good idea to switch the Foreground Colour back to black and paint over the eyes and lips a little to make sure that all the softening is fully hidden from view over them - the Red channel mask hides most but not all the softening layer in these areas (see Image 005).
Finally, consider changing the Group's layer opacity to tone down the flesh softening effect a little, to make it more subtle. The end result of all these steps is a beautiful, proportional, subtle, application of the softening over the face (see Image 003 B) which doesn't obliterate all flesh texture and is executed in less than half the time of painting the mask out by hand, from scratch.
Dave Montizambert lectures internationally on lighting, digital photography, and Adobe Photoshop. He is also a published author having written two books on lighting and digital photography (www.montizambert.com) plus numerous magazine articles on these topics in North America, Europe, Russia and Asia. Dave also creates Photoshop tutorial DVDs for www.software-cinema.com. Dave is available for lectures and workshops and can be reached throughwww.montizambert.com.


SWPP - Society of Wedding and Portrait Photographers
The Society of Photographers
Clwyd Chambers, Clwyd Street, Rhyl, Denbighshire, LL18 3LA, UK
Tel 00 44 (0) 1745 356935
Home Page - Find a Photographer - Benefits of Membership - Events and Seminars - Who's who - Photographic Trade Directory - About - Qualification Structure - Mentor Me Programme - Professional Imagemaker Magazine Articles - FREE information pack - Privacy