


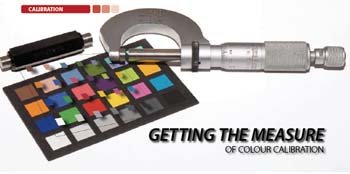
articles/Monitors/measurecolourcalibration-page1
by Mike McNamee Published 01/02/2008
First a few words of clarification. We have come across some areas of confusion out there in the world of seminars and we detect a need to sort out a few misconceptions. The large diagram below shows the locations and uses of calibration profiles. A calibration profile may take the form of an icc or icm standard format, but could also apply to the 'number set' bringing a colour to exactly match a standard reference colour, such as that found in Adobe Camera RAW.
At the left side we have two sorts of pictures. 'Accurate pictures' are those shot of a product, art reproduction, exacting commercial, medical or perhaps forensic scenes. A characteristic of such shots is a desire to obtain an exact colour match of the original scene or object. When made correctly, a print from the image should be an exact colour copy of the original scene (or painting, for example).
'Pretty pictures', conversely, aim to flatter or enhance the subject, possibly sacrificing colour accuracy - a Caucasian bride, for example, may be given an artificial tan by increasing the saturation of the skin tones, a dark-skinned bride may prefer to be imaged slightly paler. Either way, the change from reality is considered to be an enhancement.
Staying with the diagram, and starting with the scanner or camera (a device) to originate a reproduction, we calibrate the colour numbers with a profile. This creates what we shall call an 'accurate image'. The device is calibrated by imaging a set of colours, comparing the result to a known reference file and providing a set of corrections to make the original colours, and those in the image, the same. In practical terms we 'assign' the colour profile to the image file, a process known as 'tagging', so as to build in the corrections and make the image file as accurate as possible.
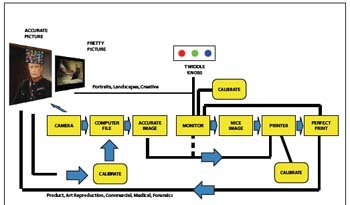
We are now in possession of an accurate image file and, if we are totally confident of our capture device profiling, we could send the image directly to the printer without even looking at it. You do not need to tweak the image on a monitor because it is already accurate. Now if you print this file on a calibrated printer, you may expect the print to be an accurate colour match of the original scene or subject.
The pretty picture route is different. Here the image is shot or scanned, hopefully quite close to accurately, but is then viewed and adjusted on the screen. The operator twiddles the knobs (often in Photoshop, but equally likely in Lightroom, Aperture or a camera-maker's software) until the image is to their liking. Providing the monitor is calibrated and the printer is calibrated, a print may be taken and compared to the monitor and will match within the limits of the viewing conditions. There is no requirement for the print to match the original scene.
This is one area where confusion seems to have arisen. Calibrating the monitor only affects the monitor, it has no influence on the colour of the output. The most common mistake is to set the monitor profile as the RGB working space in Photoshop. This is incorrect, the working space should be one of the standard ones such as sRGB or Adobe RGB or (the default for Lightroom) ProPhoto RGB. Each profile controls only the device to which it is applied. Therefore it is only while we have a calibrated monitor and a calibrated printer that we can expect a match between print and monitor.
Sadly, the world of colour is not perfect. Profiles can get colours closer to accurate, but they have to operate within the limits of gamut. The gamut is a description of the size and shape of the colour range that a device can create or show. An Adobe RGB gamut is larger than an sRGB gamut and a device that can capture or display only an sRGB gamut will be able to display a smaller range of colours than an Adobe RGB device. Do not mix up bit-depth and gamut at this point. The gamut will determine how red a red is (usually its saturation maximum) the bit depth will determine how finely you can chop up the scale from red to white (256 increments for 8-bit, 4092 for 12-bit - see Montizambert from last issue.) Similarly, a printer with three cartridges is unlikely to be able to display the same range of colours as a 12-ink cartridge set, because the three-cartridge gamut will be smaller.
Despite the frequent call to profile all your devices, we can find you any number of practitioners who are doing very well without being fully profiled. However, they are, at best, making corrections guided by experience to bring some order to their colour. Profiling makes the job more simple. The classic case is a photographer (let's call him Clicky Bill) who always sends his prints to the same laboratory. If we ask the lab we may find them saying, 'oh we always warm Clicky Bill's shots, that's the way he likes them.' This cements and ties the relationship of the lab and Clicky Bill - if he sends his files to another lab, all hell is likely to break loose because they have no idea of his desires. Conversely if Clicky Bill is calibrated, changes his files to warm them himself, and then passes them over for printing, they will be to his taste if the lab prints without any further changes (and the lab is calibrated).
In summary then, you always have to have a calibrated printer and depending upon the route to the printer, you need either a calibrated scanner, camera or monitor to enable you to confidently match the final print to either the monitor or scene.
We now move on to look at camera calibration and monitor calibration. We will not be addressing printer calibration other than to say that it is accomplished by making a set of test colour patches, measuring them with an instrument and then using software to build an icc profile to control the printing. For the better printers a profile will be available which does a reasonable job on most of the individual units and this may be downloaded from the company website, or comes on the driver CD, with the printer. The Epson 3800 and 4880 (as examples) print at acceptable commercial quality right from the box, using the profiles that come on the CD. If you require proofing level of precision you will need bespoke profiling which is specific to your printer.


SWPP - Society of Wedding and Portrait Photographers
The Society of Photographers
Clwyd Chambers, Clwyd Street, Rhyl, Denbighshire, LL18 3LA, UK
Tel 00 44 (0) 1745 356935
Home Page - Find a Photographer - Benefits of Membership - Events and Seminars - Who's who - Photographic Trade Directory - About - Qualification Structure - Mentor Me Programme - Professional Imagemaker Magazine Articles - FREE information pack - Privacy