


articles/Monitors/measurecolourcalibration-page2
by Mike McNamee Published 01/02/2008
Rags to Riches. Precision calibration for free.
An essential feature of calibration is a 'standard reference'. At it simplest this can be an 18% grey card, moving onward through the various Macbeth Charts to some very specialised targets. All of these provide an accurate 'levelling' patch for both colour and exposure. For work of any real precision the Macbeth Color Checker is the entry level, a 24-swatch target. In the general pecking order, the various calibration targets can do the following:
White Card - colour balance.
18% Grey Card - colour balance and mid-tone exposure level. Macbeth white grey black card - colour balance, mid-tone exposure level, contrast range.
Macbeth Color Checker - colour balance, mid-tone exposure level, contrast range, calibration of primary and secondary colours. Macbeth Color Checker SG - as above, but with more swatches for higher precision and a wider range of colours, including a wider gamut.
The calibration method we concentrate on here is a development started by Thomas Fors and now modified by Rags Gardner. This is based upon the Macbeth Color Checkers and provides input values to Adobe Camera RAW rather than an icc profile. The software is in the form of a Javascript and is free to download. Once it is downloaded the javascript file is dragged into the folder found at: C:\Program Files\Adobe\Adobe Photoshop CS2\Presets\Scripts It then appears under File>Scripts. Javascript files are cross-platform compatible and may be used on either Mac or PC.
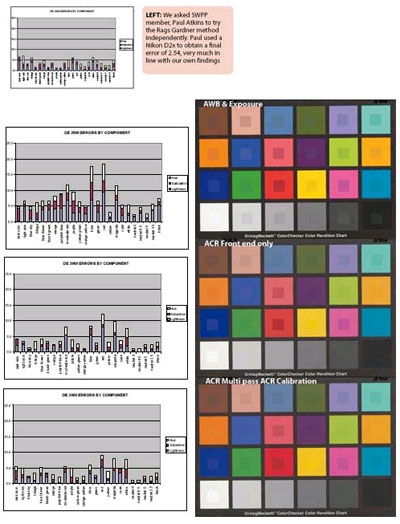
The progression of the correction sequence on the errors in the Macbeth Chart can be seen. At the top, only the white balance and exposure level have been corrected. Second down has been corrected for White Balance, Exposure, Shadow level and Contrast - that is the 'Adjust ' dialogue box values. In the lower image all the above have been corrected along with all the settings in the ACR 'Calibrate' tab (red, green and blue hues and saturations). The bars of the graphs on the left are gradually becoming smaller as the errors are brought under control. The average ?E2000 error falls from 4.64 to 3.06 to 2.61.
In use, the following procedure should be followed:
1. Set up the Macbeth Chart in even illumination of the type you wish to employ. Directional lighting is not suitable although it may be used with some modifications to the Adobe Camera RAW settings later.
2. Expose an image in which the Macbeth Chart is frame-filling and square. The exposure level should be adjusted for a top-quality result and great care should be taken. The correct exposure is the one that just fails to show clipping of the highlights and may be found by increasing the exposure until the highlight flasher lights and then backing off by a third or half stop.
3. Correct the file in camera RAW to white balance it.
4. Run ACR script (which typically takes about 10-30 minutes but could take as much as an hour on a slow machine).
5. Transfer the 'Adjust' and 'Calibrate' setting (it may be done automatically by the script, depending upon the version).
6. Open the file.
The technically correct sequence of calibration should always include an audit of your corrections. This is done with another Rags Gardner script called 'measure patches'. This compares the colour of the patches in the files with the reference values. Ultimately this may produce a set of statistics and/or a new layer that places the reference colours on their own layer above the camera image, to provide a visual assessment of the calibration.
At this stage you should have an accurate image but not necessarily a pretty image (who sells portraits of Macbeth Charts after all?). You may also find the resultant image a little flat, the contrast range in a Macbeth chart is not high. However, it represents an accurate record of the scene and an excellent starting point for monitor-based tweaking to create a neutral, 'pretty' image. Therefore, if you fancy a darker image, darken it. If you wish to lighten or darken the image, do so using the sliders on the Adjustment panel - this will leave your hue and saturation accurate, changing only the lightness values. The values set in the Calibration panel are both camera- and lighting-specific and may be left unchanged to give a starting point from which to shift colours, should you choose to do so. A good analogy for the Macbeth Chart is that of giving directions to a visitor to a town. You might tell the visitor to follow the road-signs for the town centre and the 'Cross' and then take the road out to the north for 200 yards, to find the destination point. The finding of the town cross is akin to setting up the Macbeth Chart - it fixes your position before you move out to your final point.
How good is the method?
In tests carried out using the original ACR Calibrator we achieved results that compared very favourably with those obtained using high-end software. The fact that it is free in no way lowers the quality of this method, it really is top-rate and Messrs. Fors and Gardner have done us a great service. Even if you can't be doing with all the statistics, the overlay gives you a good visual reference of how you are performing for your 'accurate' pictures.


SWPP - Society of Wedding and Portrait Photographers
The Society of Photographers
Clwyd Chambers, Clwyd Street, Rhyl, Denbighshire, LL18 3LA, UK
Tel 00 44 (0) 1745 356935
Home Page - Find a Photographer - Benefits of Membership - Events and Seminars - Who's who - Photographic Trade Directory - About - Qualification Structure - Mentor Me Programme - Professional Imagemaker Magazine Articles - FREE information pack - Privacy