articles/Photoshop/nextgenskinenhancement-page1
The Next Generation in Skin Enhancement - part 1 of 1 2
Published 01/12/2009

Current automatic skin touch-up software packages, (usually offered as Photoshop plug-ins), all operate in a similar way. Essentially, they work using filters that remove certain frequencies within the skin to remove the defects that occur at those frequencies.
Filtering in this way works reasonably well as long as the defects are small, or similar to natural skin features. However, skin filtering only has important limitations. If the defects on the skin are large, or the skin has no texture because it has been over-exposed, this approach breaks down.
f the skin defects being removed are large, the areas of skin where the defects used to be become artificial and waxy looking. The only way to hide these featureless, waxy patches is to smooth all the rest of the skin, giving the featureless, unnatural, often over-airbrushed look that characterises 'quick and dirty' automatic skin touch-up.
Until now the only way to get around this has been painstaking and time-consuming hand work, using, typically, the healing brushes in Photoshop. This means that with current technology, there is a stark choice between either over-softened skin, or lots of hand work in Photoshop (see the call-out box right - Ed.). For the hard-working wedding or portrait photographer with little time and a set budget, neither solution is ideal.

So what can be done to improve the situation? Currently software skin enhancers can only subtract from what is there. They only remove features from the skin. They cannot generate realistic new skin where this is necessary. To deal with skin properly, what is needed is an automatic skin regenerator, a 'software surgeon', capable of automatically producing realistic skin grafts, and then seamlessly blending the grafts into the existing skin where necessary.
We have incorporated just such a seamless 'skin graft' facility in the latest version of Portrait Professional touch-up software. Version 9 incorporates new, patent applied for ClearSkintm automatic skin clean up and regeneration technology, designed to give both a more natural and realistic result on existing skin and also to automatically regenerate skin, where necessary. To the best of our knowledge, this is the first commercially available automatic skin regenerator.
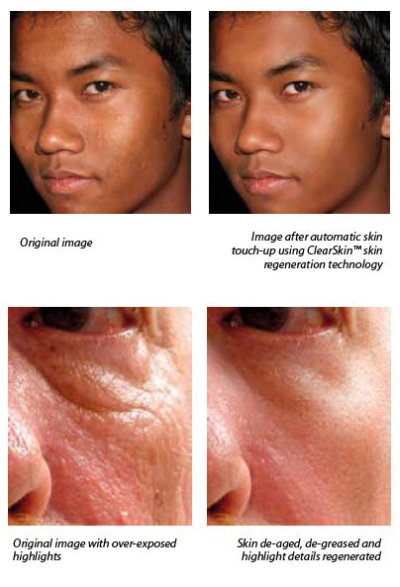
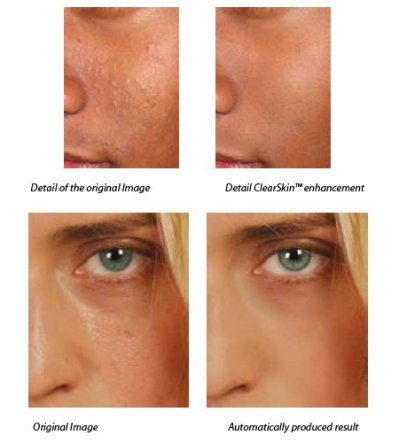
ClearSkin can regenerate natural looking skin even in 'impossible' areas such as over exposed highlights, or where very large defects have had to be removed from the skin. This ability to automatically generate skin texture also enables portraits with major problems such as over-exposed highlights or very large skin defects to be convincingly retrieved.
In the (rather extreme) example above, an old man's skin has been de-wrinkled (and, in this case, also effectively rejuvenated with younger skin) using the Clearskin™ technology. Notice that skin detail has been restored even in the over exposed highlights to the side and below the eye in the original.
What does this mean for the busy working photographer? Three things: Greater speed. Convincing skin touch-up can be achieved in a fraction of the time that was previous required. Better quality. More realistic skin touch-up can be automatically achieved, particularly in more extreme situations. And finally, less skill is required. Because the process is mostly completely automatic, significantly less skill and painstaking work is required from the photographer or touch-up artist.
If you are interested, you can evaluate this new technology for yourself. Download a free trial version of Portrait Professional 9 from www.PortraitProfessional.com and judge for yourself the effectiveness or otherwise of this new skin regeneration technology.
Skin Repair - the long method
Andrew Berend points out on the opposite page that it is possible to repair a missing skin area in Photoshop, but that it is a job for experts. This is undoubtedly true. We have done it before and refreshed our memory via Gry Garness' book on retouching (reviewed in August-September 2009). The method involves the use of the Pattern Maker and the CS4 user is immediately confronted with a problem - Pattern Maker is no longer installed by default! You have to go and find the dot 8bi plug-in file in the goodies folder on your installation DVDs or download it. Then you have to navigate to the relevant plug-in folder and drag the 8bi file across. However, you have to do this separately for the 64-bit and 32-bit versions of Photoshop and the locations are different. Ours were found in:
C:\Program Files\Adobe\Adobe Photoshop CS4 (64 Bit)\Plug-ins\FiltersAnd
C:\Program Files (x86)\Adobe\Adobe Photoshop CS4\Plug-ins\Filters
You are currently on page 1
1st Published 01/12/2009
last update 09/12/2022 14:56:57
More Photoshop Articles
There are 0 days to get ready for The Society of Photographers Convention and Trade Show at The Novotel London West, Hammersmith ...
which starts on Wednesday 14th January 2026


