


articles/Photoshop/nextgenskinenhancement-page2
Published 01/12/2009

And yes, it is a pain to find them!
Once you have navigated this Windows' minefield you are ready to start. Here is the precis version. You duplicate the 'damaged' file then select a square area of good skin to act as a model area. Then you make a pattern from this and then keep regenerating the pattern until you get one you like the look of. You then make a new file and fill it with the pattern you've just made. Then you repair the pattern to disguise any repeating sub-patterns and make the central area of this file into another pattern and save it. Then you make a new layer on top of the background of the 'damaged' file and fill it with your latest pattern. Then you make a layer mask to hide everything and then gently paint back texture with a soft, low-opacity brush. To hide your handiwork you can use Gaussian blur to soften the mask and/or change the layer opacity. With a bit of luck you will now have a seamless repair, but may well need a lie down! Don't get us wrong, the method is superb but it is not intuitive and you would not want to be doing it with dozens of images - go back across the page and read on!
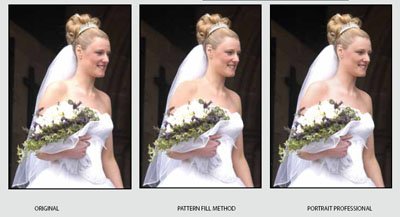
To test the various options we dug out a particularly difficult shot, taken on an old Nikon D100.The shot is a compressed JPEG and the effect of overexposure on the bride's shoulder is all too evident. The channels show the extent of the clipping, with a very 'blocky' yellow channel and an ugly yellow fringing around the highlight. The images at the bottom show the original, then the Pattern Fill method and finally a Portrait Professional version carried out in a couple of minutes by Tony Polichroniadis of Anthropics. First of all he extended the skin area to cover the shoulders using the extend brush. Then he used the touch-up brush to put texture back in the blown out areas. He judged the shoulder to be too yellow and bright, and used the shine and balance hue sliders to make it darker and more similar to the surrounding hue. The texture sliders were left on their defaults.


SWPP - Society of Wedding and Portrait Photographers
The Society of Photographers
Clwyd Chambers, Clwyd Street, Rhyl, Denbighshire, LL18 3LA, UK
Tel 00 44 (0) 1745 356935
Home Page - Find a Photographer - Benefits of Membership - Events and Seminars - Who's who - Photographic Trade Directory - About - Qualification Structure - Mentor Me Programme - Professional Imagemaker Magazine Articles - FREE information pack - Privacy